I had trouble running Home Assistant Operating System (HAOS) on my new-ish proxmox server, because it’s expecting to have UEFI, and secure boot turned off. This isn’t the default when you create a VM, and isn’t entirely configurable within the Proxmox GUI. You would think this would be well documented, but from what I have seen there are 95% solutions all over the place along with some forum posts to help get you the last 5% of the way to the finish line. There is a bash script here that you can run, but I prefer to understand how things are working myself.
What am I on about? You can run HomeAssistant (HA) core as a service on bare metal, or in docker containers, but in my experience they’ve been finicky, don’t have all of the features you’d want, or it’s hard to maintain a docker compose file without breaking everything. I ran Home Assistant Core in docker on an old Optiplex 7040 Micro that I had for a while, but wanted to start having temperature/humidity history, and couldn’t get that working without a full blown HAOS install (see one of my other posts about that), or trying to get Mosquitto to play well with the rest of my docker compose file for a month until I wanted to bash my head into a wall.
You could use a Raspberry Pi, buy a Home Assistant yellow, etc. But I already have a Proxmox host with more than enough storage and compute to handle this, and I’d rather not clutter up my rack with another piece of hardware to manage, find power bricks for, go obsolete, etc.
So I want to run home assistant operating system (HAOS) which is provided in a number of different formats to import into your hypervisor. But it requires UEFI, and also requires that secure boot NOT be enabled. So this guide will be a fusion between HAOS’s own instructions, and digging into the BIOS options for Proxmox VMs.
Step 1: Get the files
Get into the shell of your Proxmox host and find a directory where you want to put the files in the interim. I have a 8TB ZFS pool with a junk drawer folder. /slow8T/backups will work fine for this. By the time I remember where I left it, it will be superseded by a new version anyways and I can just delete this.
Download the file directly from the fine HAOS folks here. You’ll want the KVM one, which is .qcow2 format. We’re going to copy the link address, and grab it in the shell with wget. You could download it on whatever machine you’re reading this on, FTP/SCP/flash drive/etc. transfer it to your proxmox machine, but that’s more complicated. Then we’ll unpack it with xzutils, which you’ll have to install if you don’t already have it.
# wget https://github.com/home-assistant/operating-system/releases/download/11.1/haos_ova-11.1.qcow2.xz

--2023-11-01 21:04:37--https://github.com/home-assistant/operating-system/releases/download/11.1/haos_ova-11.1.qcow2.xz

Resolving github.com (github.com)... 140.82.113.4[...]Connecting to objects.githubusercontent.com (objects.githubusercontent.com)|185.199.111.133|:443 ...
connected.HTTP request sent, awaiting response... 200 OKLength: 330369916 (315M) [application/octet-stream]Saving to: ‘haos_ova-11.1.qcow2.xz’haos_ova-11.1.qcow2.xz
100%[====================================================>] 315.06M 43.2MB/s in 7.3s 2023-11-01 21:04:45 (43.2 MB/s) - ‘haos_ova-11.1.qcow2.xz’ saved [330369916/330369916]

# ls haos_ova-11.1.qcow2.xz

# apt install xz-utils

# unxz haos_ova-11.1.qcow2.xz

# ls haos_ova-11.1.qcow2

# pwd /slow8t/backups
Step 2: Create a VM with no operating system
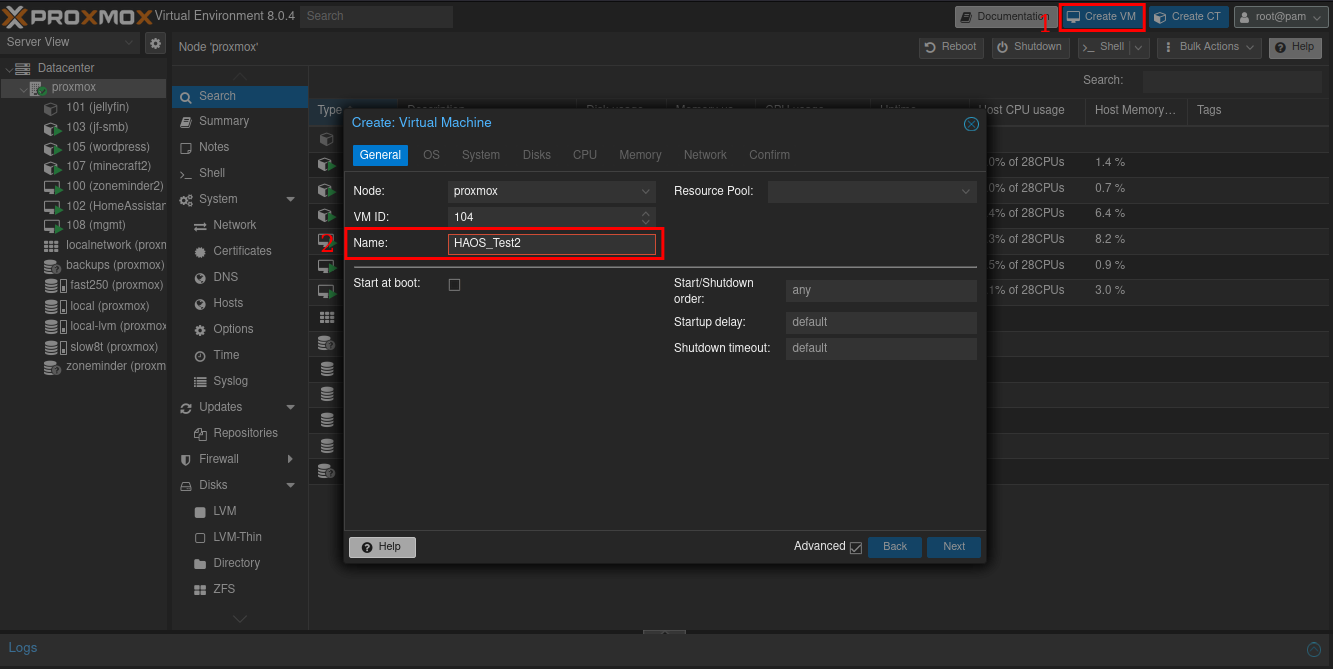
Create a VM with the GUI and give it a name.
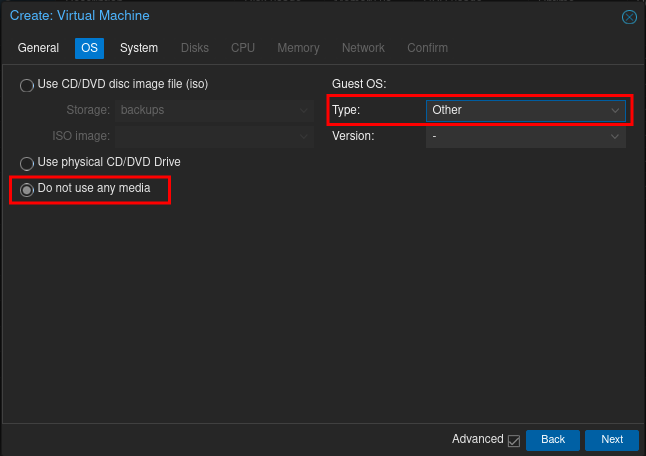
Do not use any media. Importing the image that we downloaded will take care of this. Select ‘Other’ for OS type, as HAOS is optimized to only have what it needs to run, and I’m not sure what Linux kernel it uses.
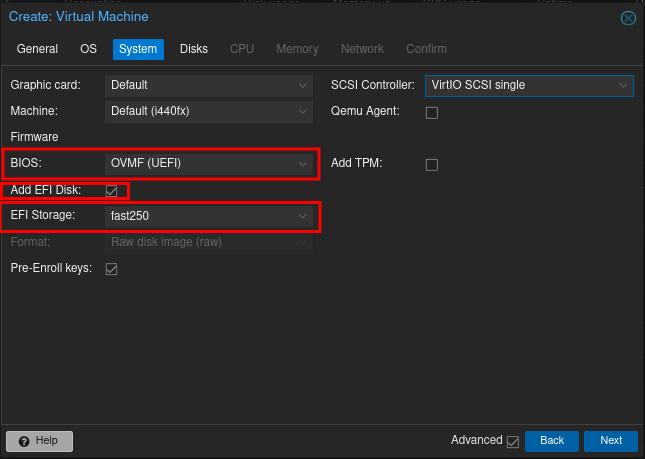
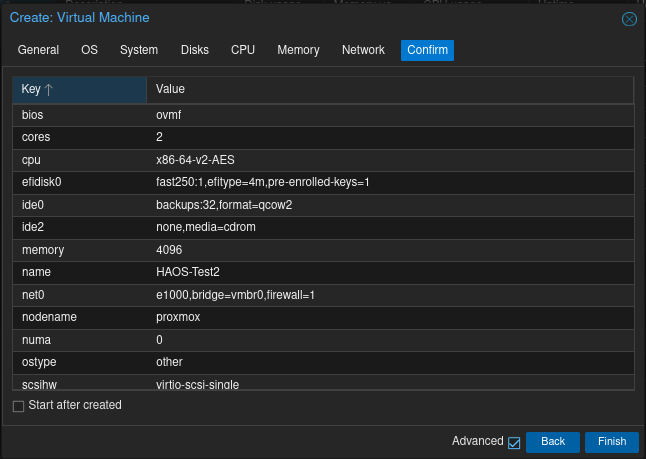
We want to use UEFI, which the default SeaBIOS doesn’t support. So switch that to OMVF, and select the pool that you want your 4MB EFI partition to live on. I’m using the same 250GB SSD (fast250) that I’ll use for the rest of the install.
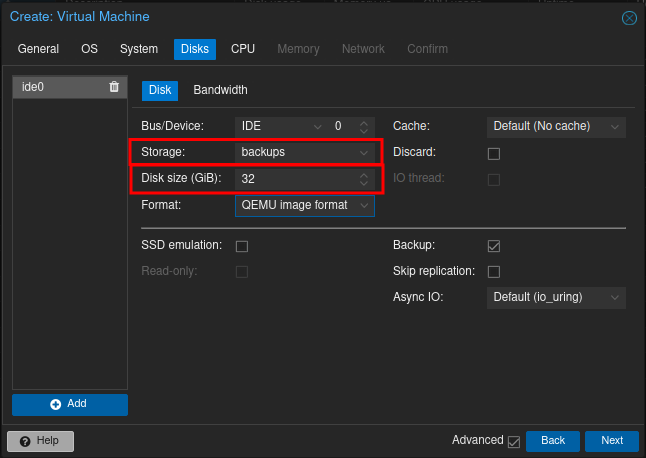
HAOS recommends at least 512MB disk space. I’m giving it 32GB, because it’s 2023 and multi-TB drives are cheap. Don’t be a miser. So choose your storage volume that you want to use.
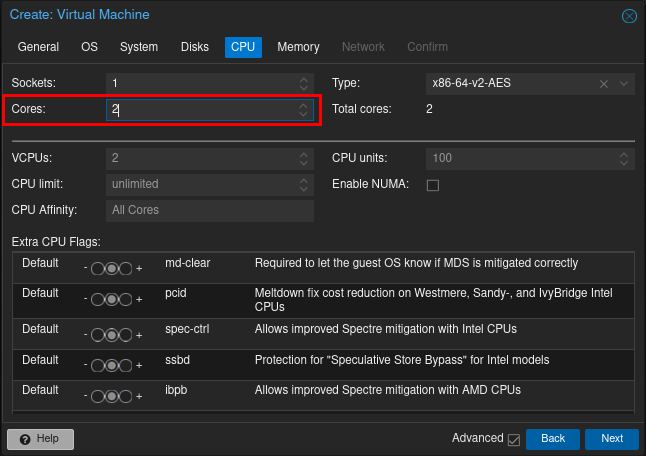
2 cores is recommended for HAOS.
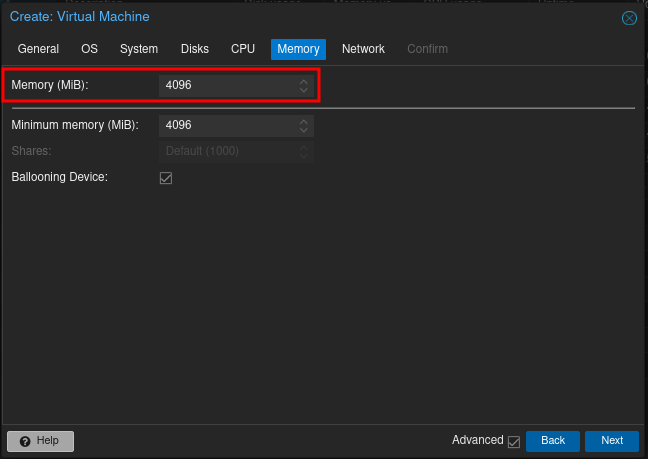
I allocated 4GB of RAM here, but my original install that I actually use is just fine with 2GB.
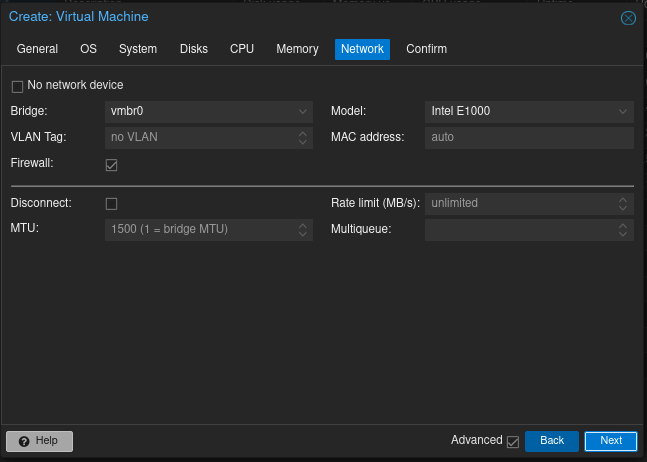
Choose network settings. I would normally setup a special MAC address and give it a static IP, hostname and domain, etc. but this is just a test and will be deleted later. So I blasted forward with defaults for now.
Confirm your choices and create the VM. Do NOT boot the VM yet. It has nothing to use to boot off of yet besides two empty disks.
Step 3: Get the downloaded image imported to your VM
Grab the VM number and storage location for that VM before moving forwards. Mine is 104, and I used my 250GB NVME drive at /fast250/ . You should still have the location of the .qcow2 file from earlier.
Open the shell on the Proxmox host again. I’m in the same working directory where I saved the file earlier. We’re going to import with the command ‘qm importdisk [VM#] [location of file] [storage pool]’
# lshaos_ova-11.1.qcow2
# qm importdisk 104 ./haos_ova-11.1.qcow2 fast250
importing disk './haos_ova-11.1.qcow2' to VM 104 ... Logical volume "vm-104-disk-2" created.
transferred 0.0 B of 32.0 GiB (0.00%)
transferred 370.3 MiB of 32.0 GiB (1.13%)
[...]
transferred 31.9 GiB of 32.0 GiB (99.74%)
transferred 32.0 GiB of 32.0 GiB (100.00%)
transferred 32.0 GiB of 32.0 GiB (100.00%)
Successfully imported disk as 'unused0:fast250:vm-104-disk-2'
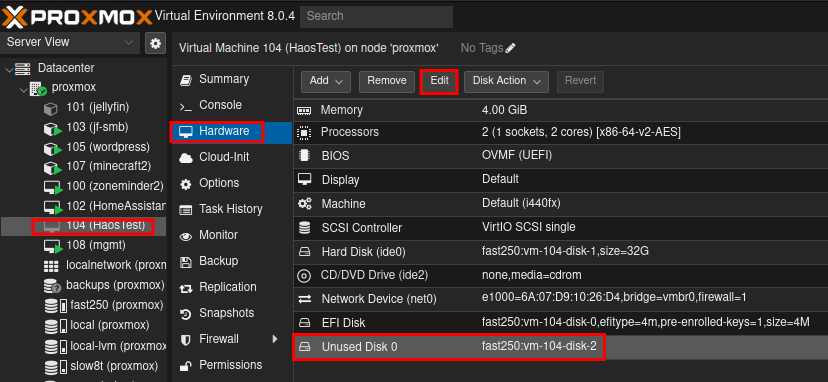
Step 3: Configure the disks
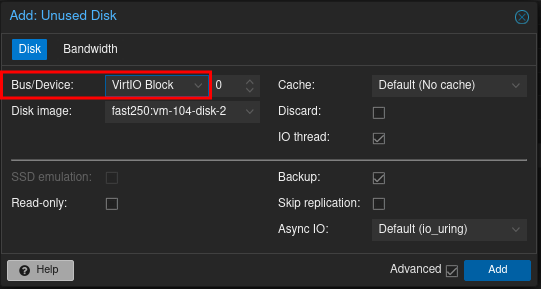
Now continue back on the web GUI. Go to the VM, hardware tab, select that disk we just imported, and edit it. Change the type to VirtIO block. This is allegedly to improve performance. I have no idea the specifics of that interface, this is just following other folks’ recommendation.
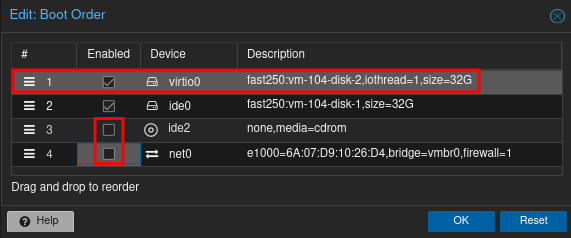
Now we go to our VM » options » Boot Order to change the new disk as the first in the boot order.
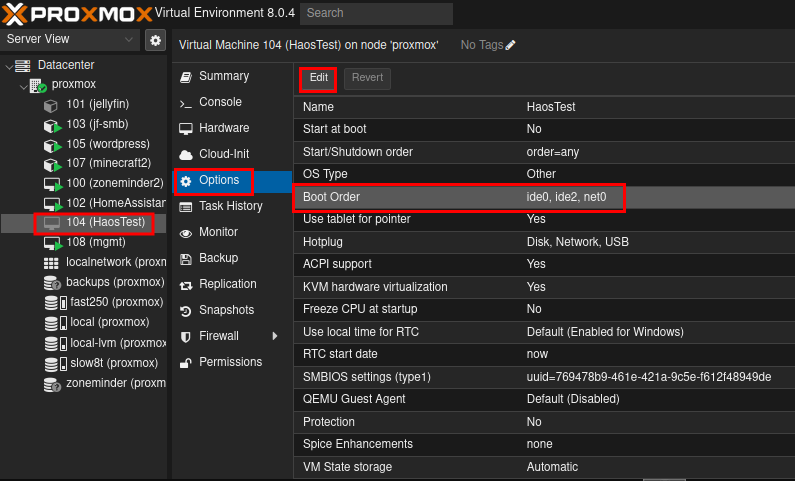
I am disabling cdrom and pxe boot since I have no idea what the use case would be for those. Our new disk is moved to the top. I’m pretty sure the ide drives can be deleted later to save space and complexity.
Step 4: Configure the BIOS
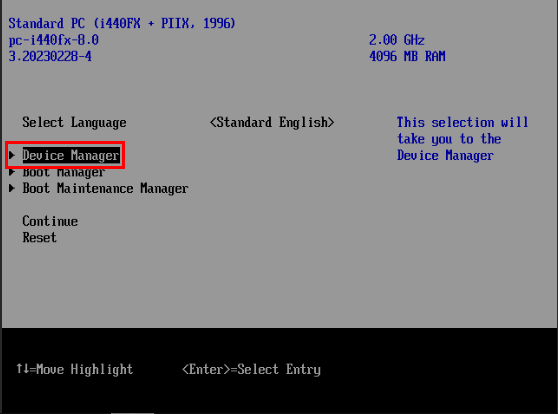
Next we open the console for this VM (the VM is still off at this point) and boot it up. Once the Proxmox logo appears press the escape key to get into BIOS options. This happens fairly quick and I didn’t fiddle with screen recording, so I don’t have that initial bit.
*If something is misconfigured at this point it may not boot, and Proxmox Shutdown or Reboot may not work. You should use the dropdown menu to Reset the VM if this happens.
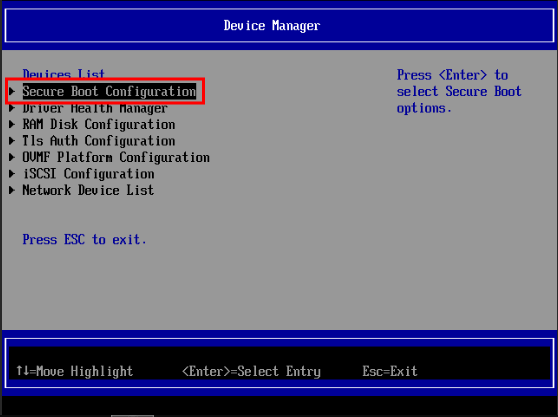
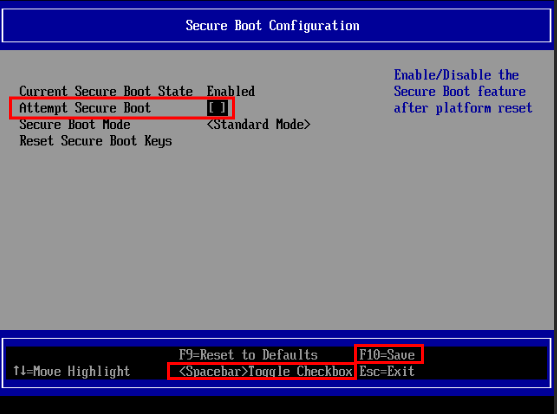
Go to Device Manager » Secure Boot Configuration » Attempt Secure Boot, and disable it with spacebar. Make sure to save with F10 when complete.
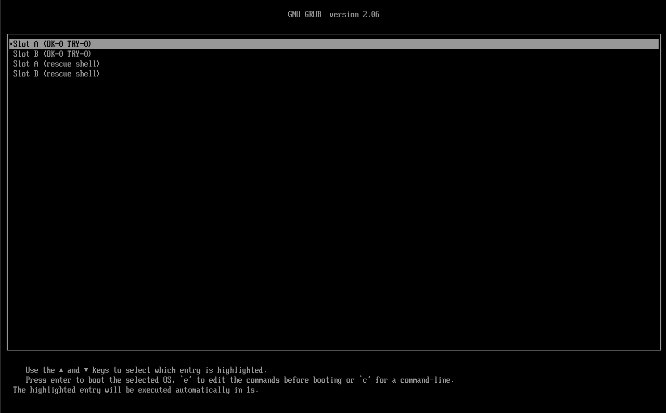
Hit escape to get back to the top level BIOS menu, and select Reset at the bottom of the list.
We now see it get through UEFI, the Grub bootloader, and get all the way into the HAOS terminal.

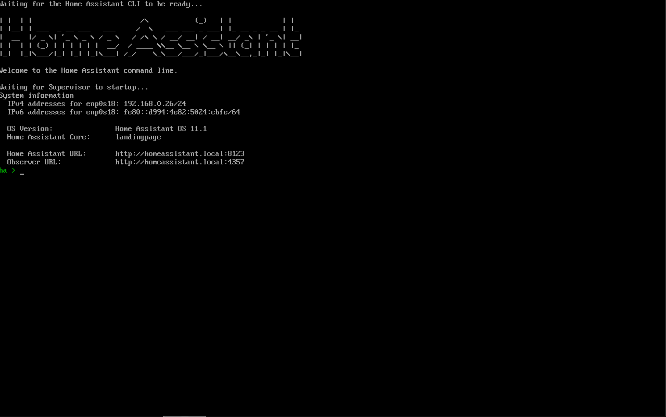
You can go to the hardware tab of your VM and delete that unused ide disk. Also delete the cdrom option as well if you want things to be more clean.
That’s it! Go open a browser and start configuring your Home Assistant instance. Or cast it into the fires of Mt. Doom like me. Do whatever you want, don’t let the haters tell you how to live your life! But now you have a more stable and feature rich HA instance than using HA core.