The problem:
When I first started with Jellyfin I used the first iteration of my homelab server hardware. An i3-2100, spare DDR3 sticks from my junk drawer, and an OS installed on a 9 year old 2.5" SATA SSD. At that time I used Debian 10, and used Docker containers to compartmentalize my services.

Since then, I’ve upgraded to Proxmox on old-ish enterprise hardware, and an increasing amount of my video library is encoded as h.265. This would be great if I had an Intel Core processor with integrated GPU, but the preponderance of Xeon processors do not have an iGPU at all. When I CPU decode a h.265 1080p video, I generally see 4-6x cores (virtual not physical, so out of 28 not out of 14) at full utilization.
But migration to my current hardware was easiest if I stuck with a docker container and migrated into the same architecture. So I have a LXC container in Proxmox, with a docker container nested inside of there. I’ve recently added an old Quadro P620 and setup hardware passthrough.
Having hardware passthrough is a prerequisite for this tutorial. I used the tutorial from Craft Computing on Youtube to get that setup. Be aware that each vendor calls PCI passthrough something different. IOMMU, or VT-d are the most common. The setting locations are also dependent upon your BIOS.
The solution:
I will create a new virtual machine with Ubuntu Server (in an ideal world I prefer Debian, but I dislike having to setup my user into the sudoers group each time, etc.) do a bare metal installation of Jellyfin, then pass through my GPU to the VM and try to setup hardware encoding. If it works (and it may not. IOMMU is still glitchy and there could be problems with my specific GPU and motherboard) I’ll continue onward to migrating the Jellyfin data, and setting up my full library by sharing my media ZFS pool with that additional VM.
Current setup:
- Proxmox
- LXC container
- Jellyfin Docker container
- Samba Docker container (to copy/paste media in a more convenient way than SCPing)
- 8TB ZFS pool
- 2x 8TB HDDs with mirrored vdevs
- Management VM
- NGINX for all services
- Nvidia Quadro P620 GPU (unallocated)
- LXC container
New setup:
- Proxmox
- LXC container
- Jellyfin Docker container
- Samba Docker container (maybe being replaced soon with Open Media Vault or TrueNAS)
- 8TB ZFS pool
- 2x 8TB HDDs with mirrored vdevs
- Management VM
- NGINX (with new upstream server info)
- Jellyfin VM
- Nvidia Quadro P620 GPU
- Access through SMB shares
- LXC container
I’m doing this in real time as I write, for fear that I’ll forget the details. So if it fails, it fails, and it’s getting published anyways.
Step 1: Create the VM and configure the OS
I’m giving it 8GB RAM, 4x logical cores, and 16GB of storage space. I’ll adjust fire if necessary.
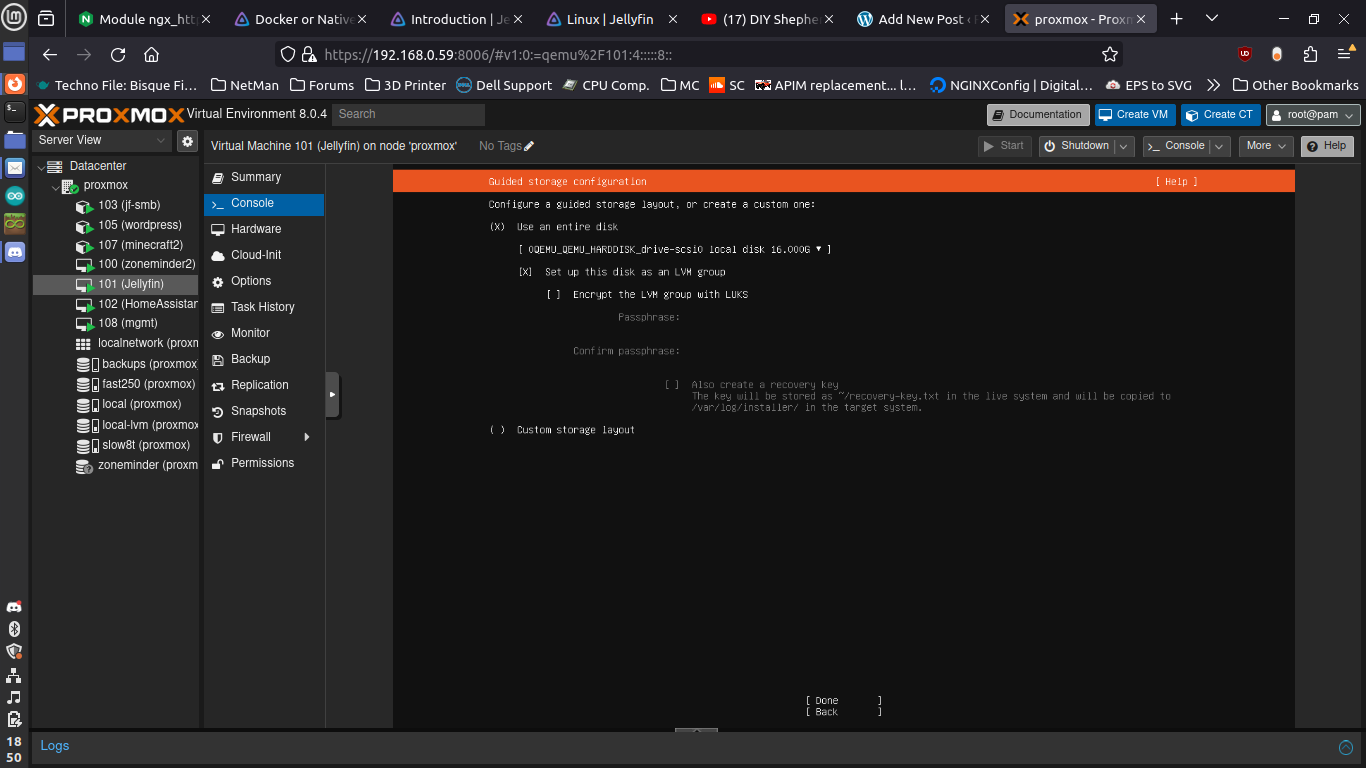
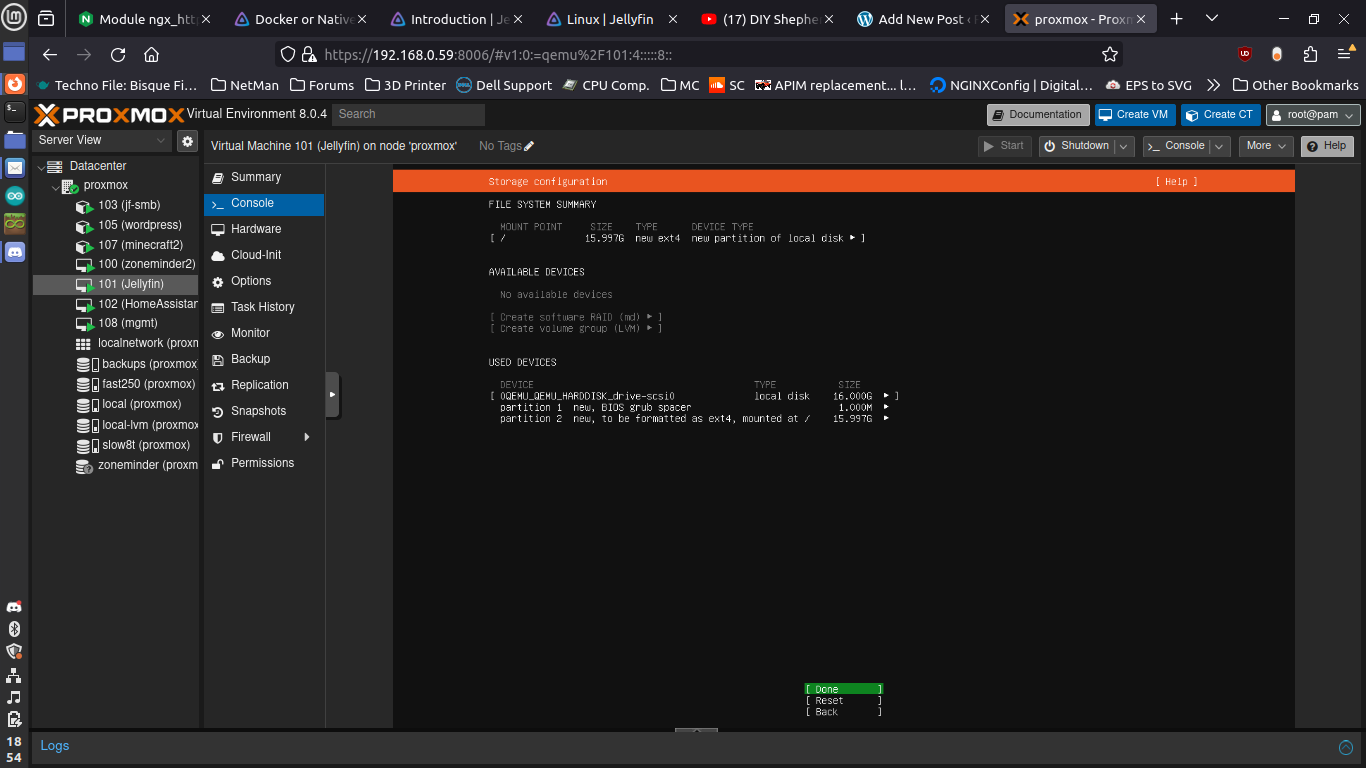
I used Ubuntu Server 22.04 because it’s what I had an image for that was already available. Don’t let it use the virtual disc however it wants. It will setup LVM and mount points in the worst possible way. Choose the virtio disc as your boot device for it to create a Grub boot partition. Then use the remainder of the space for a single ext4 partition mounted at /
Make sure your GPU is assigned in the hardware tab. Reboot the VM if necessary. I really should have done this before booting the first time, just in case there were some proprietary drivers the install process caught and installed for me automatically. Run lspci at the end to make sure your VGA device shows up. It will not necessarily show up with the same UID and name that the hypervisor is tracking.
$ lspci

...00:02.0 VGA compatible controller: Device 1234:1111 (rev 02)...00:10.0 VGA compatible controller: NVIDIA Corporation GP107GL [Quadro P600] (rev a1).
Mine shows up with the same UID 00:02.0 but name “Hostpci0” and an additional 00:10.0 with the correct name, “VGA compatible controller: NVIDIA Corporation GP107GL [Quadro P600] (rev a1)” instead of just the single device on the host. I’m not sure if both are working in conjunction with one another, or if it’s just happenstance that the UID happens to be the same 00:02.0 on both Proxmox and in the VM.
Step 2: Install Jellyfin and Test It Out
Next install Jellyfin as a service. There is a script maintained by the Jellyfin group on their website here. For Debian based distros you just curl their link, then pipe it into bash. I didn’t setup a firewall on the VM through Proxmox, or with UFW in Ubuntu Server. If you did, you might want to make sure your port is open “ufw allow 8096”
Next I need a h.265 video to decode. I grabbed one from here. I don’t want to add my ZFS pool to this VM, import a huge library, then realize I need to fix something. So I’ll create a library locally with just the one video first.
I think the installer script uses snap (which I’m not a fan of, but I won’t get into that here. There is value in sticking with the default install for future support requirements). And snap doesn’t have access to the /home/ben/videos folder that I saved it to. So let’s try and see if we can chown and chmod that folder to nobody:nogroup and get around the library import errors.
Don’t forget to yell at the console because these commands use a capital r for the recursive flag (unlike the entirety of the sane people in the world!). Also ask yourself how I was logged in as myself, in my own home direcory, and somehow managed to create a folder that was originally owned by root:root with rw-rw—- permissions.
$ sudo chown -R nobody:nogroup ./videos/

$ sudo chmod -R 777 ./videos/

$ cd videos

$ ls -la
drwxrwxrwx 2 nobody nogroup 4096 Dec 7 17:47 .
drwxr-x--- 5 ben ben 4096 Dec 7 17:49 ..
-rwxrwxrwx 1 nobody nogroup 96222521 Mar 19 2014 tos-1720x720-cfg01.mkv
In the Jellyfin UI I tried to type the folder to add to my libraries, which turns out did not work. You have to manually navigate through the folders. At this point I’m curious if I needed to modify permissions on my folders earlier, or if I was just using the GUI incorrectly. I thought systemd was running the service as root anyways. But I’m leaving it as is for now, since it works.
Step 3: Test Performance w/ CPU Decoding

This is not an unreasonable amount of CPU usage for brute force transcoding. But I think the GPU is more efficient at it, and if I end up with multiple users or 4k streams, it could quickly shut me down.
I’m not a video encoding expert. There should be some set amount of overhead, so not a linear correlation between resolution and CPU utilization, but probably fairly close. a 1080p60 video should theoretically be 4x the load or 4(13.84-1.06)=51.12% = 14.3x cores, if they were allocated. If I watch one video on my phone while traveling at the same time someone is watching a 1080p movie at home on the TV, I could really mess up other services that are more important, like security camera monitoring/recording.
Step 5: Make GPU Decoding Work
Go to the admin dashboard on the Jellyfin GUI » Playback. Then look at the Transcode section and select your decode/encode options accordingly. I’m using this website from Nvidia to make sure I have my codec options selected correctly to avoid trying to transcode something the hardware isn’t capable of.
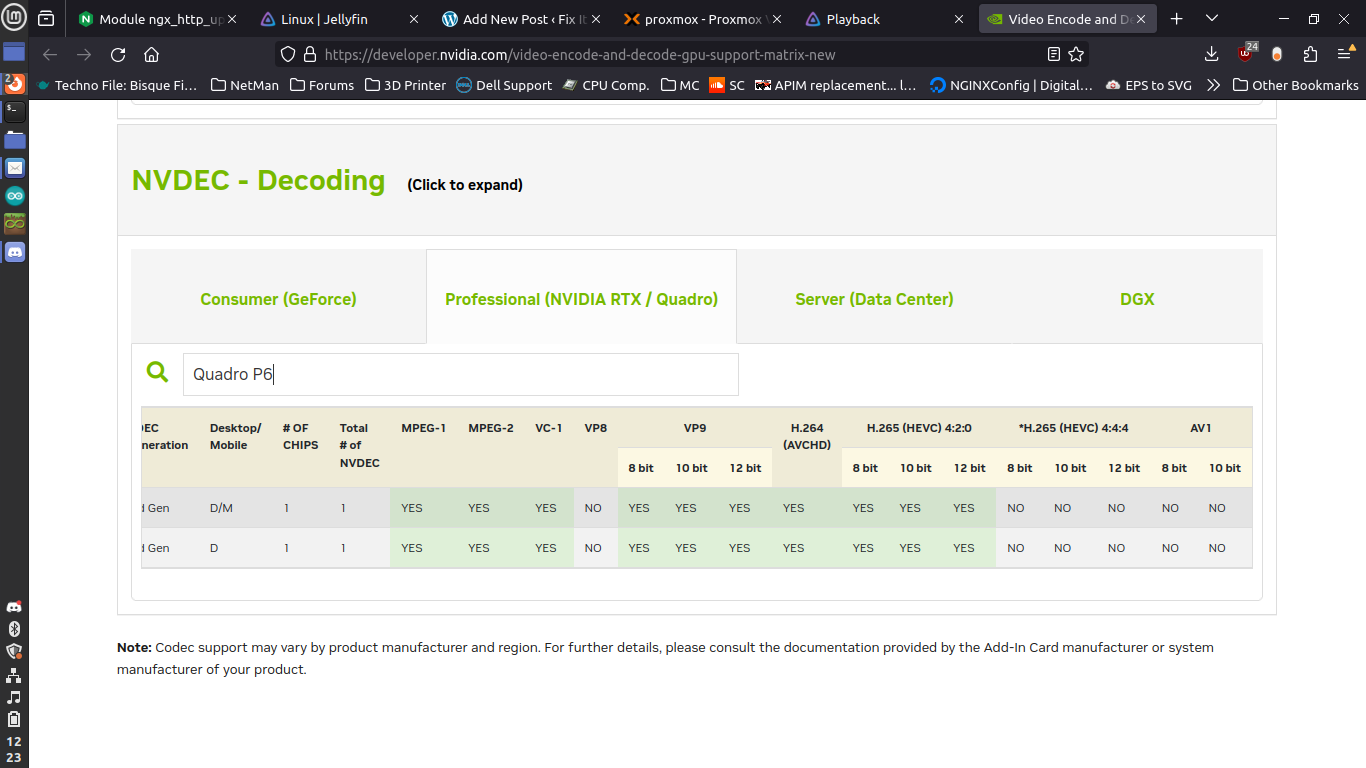
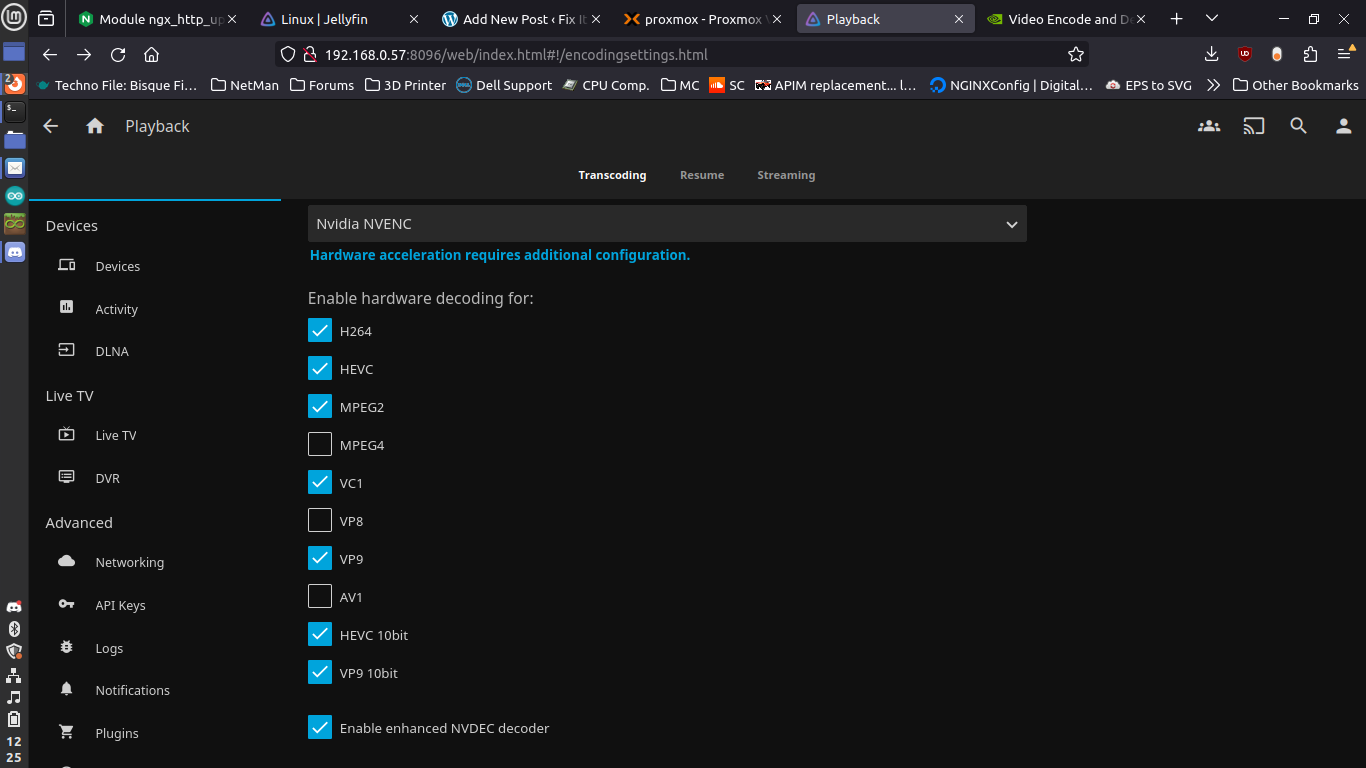
My GPU doesn’t support HEVC uncompressed (4:4:4), but does support HEVC compressed (4:2:0) at 8/10/12 bit. The Jellyfin settings only specify hardware decoding HEVC as standard, and another for 10-bit. So we’ll see if this works and adjust if necessary.
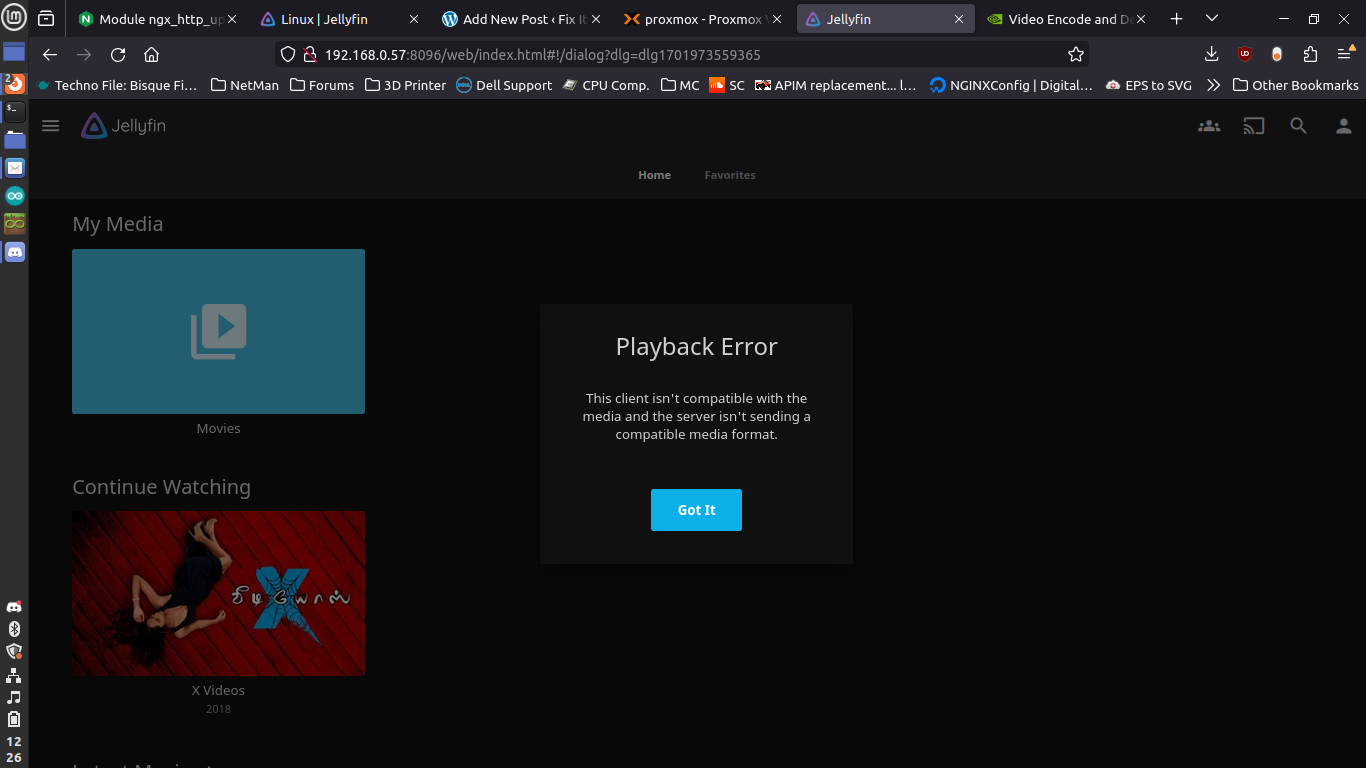
Well shit. Let’s turn off h.265 encoding. That really serves no purpose. If my client can decode it, it should send the file directly. And if the file was already in h.264 or something else, then it should just send that. The only reason it would encode as HEVC would be to save bandwidth, but if I’m watching HD movies on a road trip, I already don’t care about that.
Ok, I did a big dumb, and didn’t read the documentation fully. I need to make sure I have the package jellyfin-ffmpeg5 installed. Which I did, as part of the updated install script. Also need to make sure I have the nvidia drivers. Use the ubuntu-drivers tool to accomplish this.
$ sudo ubuntu-drivers list
nvidia-driver-418-server, (kernel modules provided by linux-modules-nvidia-418-server-generic)
nvidia-driver-390, (kernel modules provided by linux-modules-nvidia-390-generic)
nvidia-driver-525-server, (kernel modules provided by linux-modules-nvidia-525-server-generic)
nvidia-driver-450-server, (kernel modules provided by linux-modules-nvidia-450-server-generic)
nvidia-driver-525, (kernel modules provided by linux-modules-nvidia-525-generic)
nvidia-driver-535-server, (kernel modules provided by linux-modules-nvidia-535-server-generic)
nvidia-driver-535, (kernel modules provided by linux-modules-nvidia-535-generic)
nvidia-driver-470, (kernel modules provided by linux-modules-nvidia-470-generic)
nvidia-driver-470-server, (kernel modules provided by linux-modules-nvidia-470-server-generic)

$ sudo ubuntu-drivers install
The last command will install whatever it decides is the best driver for your card. Or you can add a choice at the end if you want something specific sudo ubuntu-drivers install nvidia:525 More info here for ubuntu server specifics.
Then make sure you have server utilities installed using apt. My newest version in the above step was 535
$ sudo apt install nvidia-utils-535-server

$ sudo apt install libnvidia-decode-535-server libnvidia-encode-535-server
Reboot for good measure. I tried to run nvidia-smi right after install and had issues. Also had trouble trying to reboot the VM, I’m curious if that’s because it’s having trouble trying to manage power states on a card that’s actually owned by the host. Optional* go into proxmox and kill the VM manually, then reboot and SSH in again.
$ nvidia-smi
Thu Dec 7 19:18:31 2023
+---------------------------------------------------------------------------------------+|
NVIDIA-SMI 535.129.03 Driver Version: 535.129.03 CUDA Version: 12.2 |
|-----------------------------------------+----------------------+----------------------+|
GPU Name Persistence-M | Bus-Id Disp.A | Volatile Uncorr. ECC |
| Fan Temp Perf Pwr:Usage/Cap | Memory-Usage | GPU-Util Compute M. |
| | | MIG M. |
|=========================================+======================+======================|
| 0 Quadro P600 Off | 00000000:00:10.0 Off | N/A |
| 39% 50C P8 N/A / N/A | 2MiB / 2048MiB | 0% Default |
| | | N/A |
+-----------------------------------------+----------------------+----------------------+
+---------------------------------------------------------------------------------------+
| Processes: || GPU GI CI PID Type Process name GPU Memory || ID ID Usage |
|=======================================================================================|
| No running processes found |
+---------------------------------------------------------------------------------------+
Note to self - Figure out how to make the /code blocks in wordpress prettier. Even at the smallest font size, they’re still ugly without side scrolling. The default word wrapping is terrible for reading the same way you see it in terminal. I also haven’t mastered the usage of the nvidia-smi tool to actually give me useful stats, so I would appreciate comments that help shed some light on the more obscure flags for this use case.
The final step after that check is to go into the Jellyfin settings, which I did upfront. I’ll go back and make sure they are what they should be for good measure.
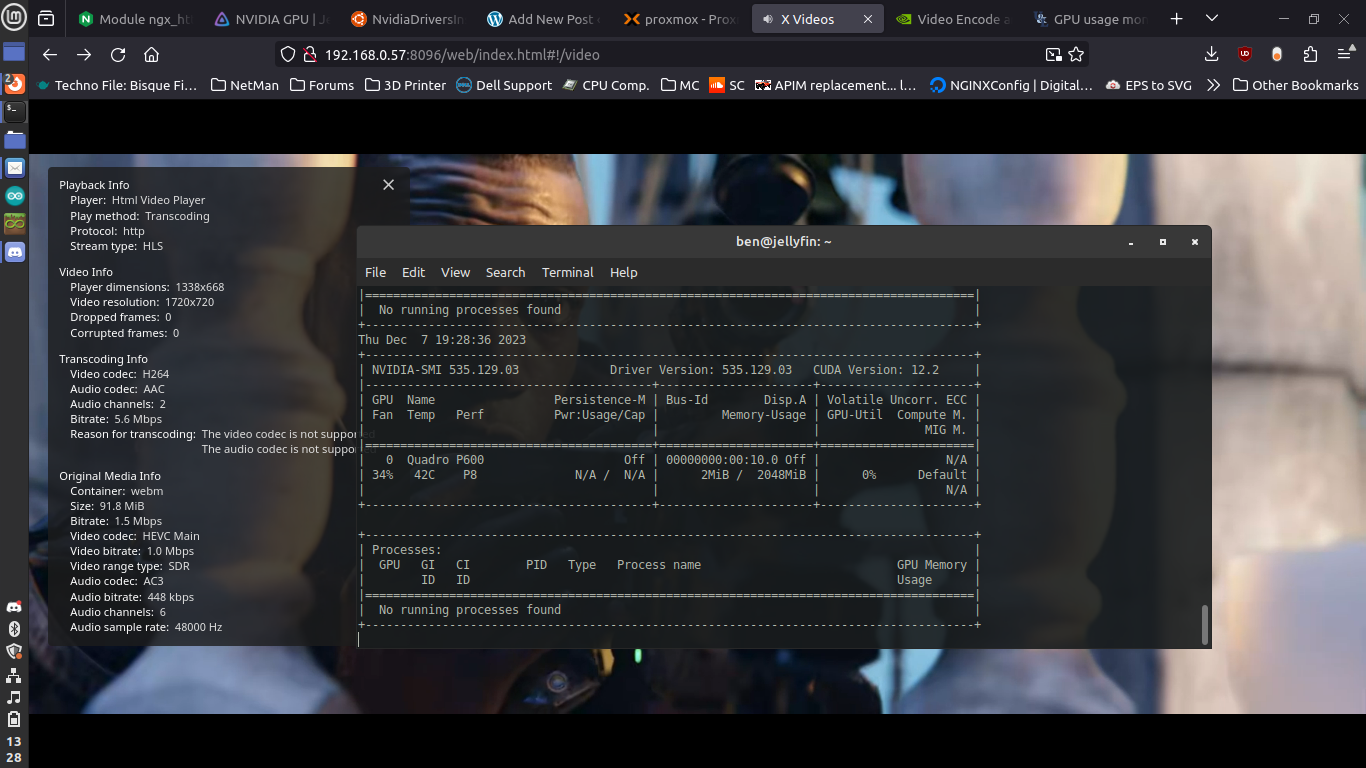
Everything seems to be working. I’m decoding h.265 and sending to the client as h.264 with no issues. I downloaded a 4k60 h.265 video, Big Buck Bunny from the Blender Foundation here, and everything seemed to work ok. It was decoding the HEVC file and feeding it to my browser at 1366x768 dropping ~5 frames each second. I’m not a video snob, almost everything I have is 1080p or worse, so this isn’t a problem for me.

Running the same video on my laptop (a 7th gen i5 with no discrete GPU) yielded pretty terrible results. My CPU was pegged eking out a miserable 40FPS and chewing through my battery at lightning speed.
Step 6: Clean Up Settings, Import the Full Library
Now it’s time to go attach my ZFS pool of media to this VM, ensure I have a static IP, migrate all of my user data/playback history/etc. (which will be the most difficult part. I think there are some strange things going on with file structure to make the docker implementation work, and all migration tools are 3rd party), and update my NGINX upstream server settings.
# cat docker-compose.yml
version: "2.1"
services: jellyfin:
image: lscr.io/linuxserver/jellyfin:latest container_name: jellyfin environment: - PUID=1000 - PGID=1000 - TZ=America/Chicago - JELLYFIN_PublishedServerUrl=192.168.0.81 volumes: - ./library:/config - /media/8T/Kids_TV:/data/tvshows/kids - /media/8T/Adult_TV:/data/tvshows/adults - /media/8T/Kids_Movies:/data/movies/kids - /media/8T/Adult_Movies:/data/movies/adults - /media/8T/Music:/data/music ports: - 8096:8096 - 8920:8920 - 7359:7359/udp - 1900:1900/udp restart: unless-stopped

root@jf-smb:/home/docker/jellyfin# cd library/

root@jf-smb:/home/docker/jellyfin/library

# ls
cache data dlna encoding.xml log logging.default.json migrations.xml network.xml system.xml
So the docker instance has one /library folder mounted to /config in the docker filesystem. The Jellyfin-Migrator states “…Turns out the Jellyfin database is a nightmare…”, that the script they wrote was specifically to migrate from a Windows setup into Linux, and that the script will only work in Windows.
The Jellyfin page on migration at least gives us some good hints. Let’s see if that makes sense given what we have in docker.
/docker/jellyfin/library# tree -L 3

|-- cache|
|-- audiodb-album|
| |-- 17027712-7707-3791-ab65-5320e5ebe501|
| |-- 17938f4b-9aa6-4457-a5da-a51157932347|
| |-- 738e2790-2efb-3ac1-bd11-725ddb97265b|
| |-- 9a076153-ff33-4ea5-a53e-250c18fca001|
| `-- dbb71f1a-f9cb-3586-ba93-94150398368d|
|-- audiodb-artist|
| |-- 0004537a-4b12-43eb-a023-04009e738d2e...|
| `-- f45da029-7b00-4bf3-962c-0eeb20309cc4|
|-- extracted-audio-images|
| |-- 0|
| |-- 1|
| |-- 3|
| |-- 4|
| |-- 5|
| |-- 6|
| |-- 7|
| |-- 8|
| |-- a|
| |-- b|
| |-- c|
| |-- e|
| `-- f|
|-- images|
| `-- resized-images|
|-- imagesbyname|
| `-- remotestudiothumbs.txt|
|-- omdb|
| |-- tt0071230.json
| | |-- tt0083642.json|
| |-- tt0106977.json|
| |-- tt0120873.json|
| |-- tt12004038.json|
| |-- tt14270702.json|
| `-- tt15671028.json
| `-- temp
| |-- 0ea05a07c0f44db6bed94fd76674c311.png
| |-- 140e2226b5ff4996b1147cc4cbb2fbb9.png
| |-- 5abd9eef4abb4e748011f0a8ae2c7a9e.png
| |-- 986b7834dcbc40b89b3df6a79e4f088e.png
| |-- d616a8c9848645649f252f1f20c921ab.png
| `-- dbc8dd5e826a4a96a8d7c26d7c94207a.png
|-- data
| |-- data
| | |-- ScheduledTasks
| | |-- device.txt
| | |-- jellyfin.db
| | |-- jellyfin.db-shm
| | |-- jellyfin.db-wal
| | |-- keyframes
| | |-- library.db
| | |-- library.db-journal
| | |-- playlists
| | |-- splashscreen.png
| | `-- subtitles
| |-- metadata
| | |-- People
| | |-- Studio
| | |-- artists
| | |-- library
| | `-- views
| |-- plugins
| | `-- configurations
| |-- root
| | `-- default
| `-- transcodes
|-- dlna
| |-- system
| | |-- Default.xml
| | |-- Denon\ AVR.xml
| | |-- DirecTV\ HD-DVR.xml
| | |-- Dish\ Hopper-Joey.xml
| | |-- LG\ Smart\ TV.xml
| | |-- Linksys\ DMA2100.xml
| | |-- Marantz.xml
| | |-- MediaMonkey.xml
| | |-- Panasonic\ Viera.xml
| | |-- Popcorn\ Hour.xml
| | |-- Samsung\ Smart\ TV.xml
| | |-- Sony\ Blu-ray\ Player\ 2013.xml
| | |-- Sony\ Blu-ray\ Player\ 2014.xml
| | |-- Sony\ Blu-ray\ Player\ 2015.xml
| | |-- Sony\ Blu-ray\ Player\ 2016.xml
| | |-- Sony\ Blu-ray\ Player.xml
| | |-- Sony\ Bravia\ (2010).xml
| | |-- Sony\ Bravia\ (2011).xml
| | |-- Sony\ Bravia\ (2012).xml
| | |-- Sony\ Bravia\ (2013).xml
| | |-- Sony\ Bravia\ (2014).xml
| | |-- Sony\ PlayStation\ 3.xml
| | |-- Sony\ PlayStation\ 4.xml
| | |-- WDTV\ Live.xml
| | |-- Xbox\ One.xml
| | `-- foobar2000.xml
| `-- user
|-- encoding.xml
|-- log
| |-- log_20231206.log
| |-- log_20231207.log
| `-- log_20231208.log
|-- logging.default.json
|-- migrations.xml
|-- network.xml`
-- system.xml
Good god. That’s not helpful. And I am NOT digging through each and every one of those. Mainly I wanted to preserve the usernames and passwords, what’s been watched, and what’s supposed to be in the recently played list. But we’re starting over.
The recently watched items have always been jacked up. I.e. if you are going onto an airplane and won’t have a connection at all, then you want to download a few episodes of a show. Then you watch them on your phone locally. Then you come back and start watching the next season at home. The previous season’s episodes show up as Up Next and even if you manually change them to watched won’t fall off of that list. Also, only one user besides me has changed their password from what I gave them initially (I just tried, and got into everyone’s profiles on the first try).
So I’m skipping this step for now. I think it would be nice for the Jellyfin devs (who are all working for free) to create an import/export feature that gives you a single zipped file. But I digress. Shameless plug to throw them your time/skills or money if you like what they’re doing. Usually $5-10 per year is what I do. Projects like this that really improve my quality of life are well worth it to keep them alive (wikipedia, octoprint, etc.)
Step 7: Mount existing SMB shares into new VM
Next we need to mount our existing SMB shares in our new Jellyfin VM. Edit your fstab file with: network location of share, location to mount locally, credentials file location, and user/group “jellyfin” so that the Jellyfin process can rwx as it needs to. From the Jellyfin console logged in as non-root user:
$ sudo nano /etc/fstab//[host ip with SMB shares]/Adult_Movies /media/Adult_Movies
cifs credentials=/home/ben/.smbcredentials,uid=jellyfin,gid=jellyfin 0 0

$ sudo mkdir /media/Adult_Movies

$ nano ~/.smbcredentialsusername=[username for SMB share]password=[pass to go along with username]domain=[your domain, mine is "workgroup" because I'm lazy]

$ sudo chown /home/ben/.smbcredentials jellyfin:jellyfin

$ sudo mount -a
Repeat this process for each share. Check all mounts at the end to make sure they’re where they should be. On the host filesystem I have everything managed by another user. But since I’m mounting in fstab as jellyfin:jellyfin they show up with those permissions once mounted, recursively. So there should be no issues with that process doing what it needs to.
Step 8: Test New Jellyfin Web Interface
This is fairly easy. Just going back to the IP of my new Jellyfin instance at port 8096 and adding all of the libraries which are now in /media/{Adult,Kids}_{Movies,TV} on that filesystem. All metadata should already be there, so make sure to select options to prefer existing metadata over filenames when rebuilding the library.
Also going to add in users again, and test out some HEVC files just to make sure nothing squirrely is going on with IO. I’m currently going ZFS pool » Proxmox » LXC container » Samba docker container » CIFS mount » Jellyfin process.
Not a great solution, but OpenMediaVault really doesn’t want to work without direct access to physical drives. I now know why other people run two servers, one just for storage with TrueNAS, and another just for Proxmox. I guess in the future I’ll have to lean that direction, or find a novel way to reconfigure this better directly in Proxmox.
Step 9: Update NGINX, Cleanup
This is simple, after everything else has already given me headaches. Nothing more than ensuring the new backend has a static IP in its OS, updating a NGINX configuration and reloading, and deleting the temporary media directory I used to test HEVC files. Don’t forget to shut down the docker container running the old Jellyfin isntance. I’m not going to prune it quite yet, until I’ve had a few weeks on the new setup with no issues.
*To be updated with performance stats, but only after I learn how to use nvidia-smi a little better. I would like to know what the resolution/framerate vs. CPU/GPU load are, and how far away from linear it is.
Final Thoughts:
Ultimately right now this is one of the only graphics cards that I can use in my server. My rack is only so deep, based off of the available space in the laundry room/pantry area. So my case is 3u and only 18in or so in depth. In the future, after we move, I’ll have to get a full depth rack, and will try to get a nicer case that can hold everything with a little more room to breathe.
I would like to have 2.5" and 3.5" hot swap bays aplenty, so that I can expand my storage pool. And in my current case the HDDs hang over the motherboard, almost touching the top of the RAM sticks. So that isn’t conducive to having a full depth GPU.
 This is the previous iteration with the old AMD card, but shows the lack of available space.
Once I have a larger case, I should be able to mess around with some Nvidia Tesla P40s or similar. The ideal setup would be to have 2x of those, and segment them virtually so that I can assign one to Jellyfin, and three to individual windows VMs with parsec. That way I can have on-demand gaming VMs that are pretty stout, without having individual towers in each kid’s room. They can just use a thin client and a monitor and get good framerates and latency as long as they’re on the wired LAN. And we can divest of some towers in bedrooms.
This took entirely too long. At one point I tried to create an OMV container, which required Debian 10 or 11 only, and ended up sinking an hour or so into that before realizing that it wasn’t going to play nicely without shared files on their own disks. It’s always something. But I guess what doesn’t kill me only gives me something new to put on a resume in the future.