This will cover using https for Home Assistant OS. I do not have my instance exposed to the internet, I only want to use it locally. If I need to get into my network from outside the house, I use wireguard. But I wanted to use the ESPHome add-on to flash firmware directly on my laptop, which requires https to send the firmware file across to me.
The way the HASS documentation wants you to do this is to use their service to access your HA instance remotely through their cloud service, by paying some money and using an add-on. “And it really is the best option , because you’re also supporting the developers!” ™
I’m happy to monetarily support the developers of a tool that’s useful to me (and this is your weekly reminder to support the open source projects that you use so they don’t disappear). I’m also confident in the HA team’s ability to make sure it’s secure, moreso than most commercial entities. But I’m not exposing control of anything inside the walls of this house to the internet through someone else’s cloud service. Remember kids, “the cloud” is just someone else’s computer that you don’t have any control over.
For those not following tech news, there have been two separate 3D printer manufacturers (Creality and Bambu Labs) that recently have had webcam services with major problems. I.e. folks pulling up “their” feed on the manufacturer’s portal and having someone else’s house streamed into their browser. And by extension, their house being live streamed into god-knows-who’s browser. So I’m not playing those games.
There was also a botnet just a few days ago consisting of people’s smart toothbrushes… When the marketing department needs the product delivered, and it hasn’t reached technical maturity, odds are the engineers will be overridden, and the product will ship no matter how bad or insecure the firmware is. I digress…
So what are we going to do, if you’re not using their tools?
I’m not entirely sure. There isn’t a whole lot of documentation that I can find readily for my exact solution. People seem to be content using cloud services, or installing a NGINX add-on, but that for some godawful reason has a MariaDB dependency. I have NGINX already running and catching all http/https traffic coming into my house, so I would like to just use that, and add an additional config file for this particular site.
This idea isn’t entirely hashed out, so we’re going to learn as we go. The initial plan is:
- Ensure I have a hostname setup on my HASS virtual machine. ICANN just a few days ago announced that .internal is intended to never be used as a top level domain. So I should be able to assign it hass.internal or hass.arpa without running into DNS issues upstream of PiHole.
- Create a self signed certificate with OpenSSL. I can’t use LetsEncrypt to generate a certificate for an invalid domain name (not a public TLD) when it comes time for the challenge and signing the cert, so I will have to make my own. I will try to ensure I have my own certificate authority (CA) that I can install on my laptop and phone, to avoid warnings about an untrusted CA every time I connect.
- Create a NGINX sites-available (and sites-enabled symbolic link) config file for my domain, and point at my HAOS virtual machine as an upstream server.
- Restrict access in NGINX for that site only to internal IP addresses. When I use wireguard to VPN into my home network, my device uses the same local static IP that I would normally have, so this should work fine.
Just thinking about it, it sounds a bit complex in one particular use case: trying to get into HASS while I’m remote. I.e. my phone resolves DNS, my router receives and forwards traffic to the VM with wireguard running. Then that traffic gets forwarded to NGINX on another VM on the same host for the handshake. Then that gets routed to a third and final VM that’s running HAOS. Lots of places for things to go wrong, but I like having a single NGINX instance running, handling everything, all config files in the same folder.
It is less complex than if they were on individual machines, and having to route traffic over wires and through a switch, rather than internal to the machine in the IP stack. I’m glad I consolidated multiple old machines into one higher powered machine. We’ll see how it works out…
HAOS Hostname
Not required, since I’m going through NGINX. Now that I think about it, I technically should be resolving this to where NGINX is running, so that TCP/IP datagram has the hostname when it hits the NGINX process, not the HAOS machine itself.
So let’s go into PiHole and assign that domain name to my NGINX instance.
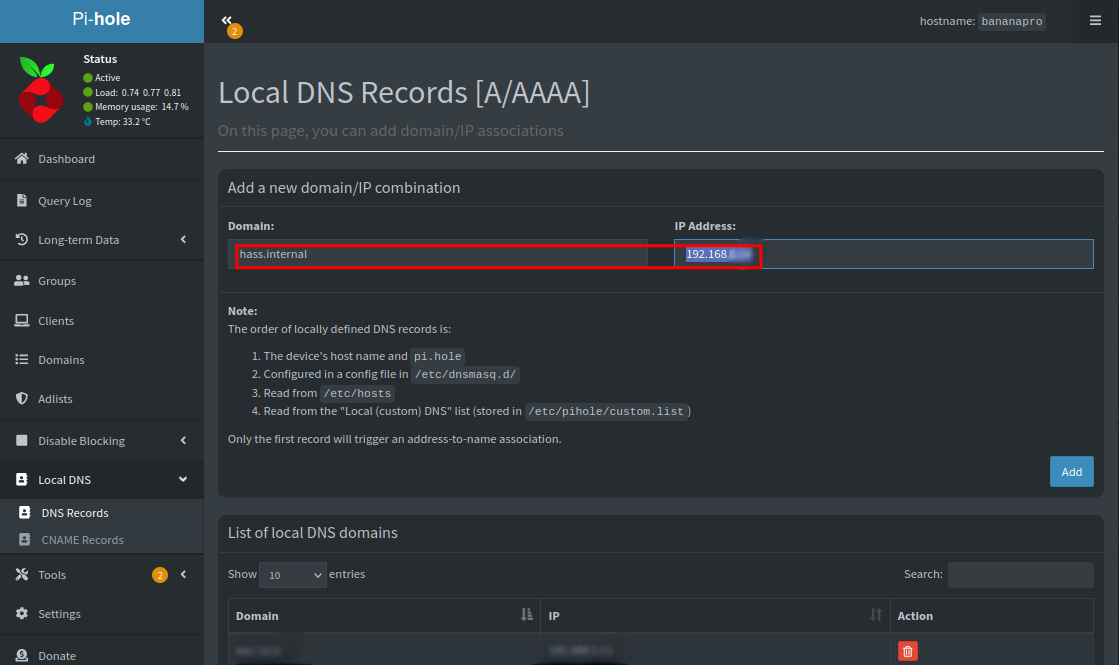
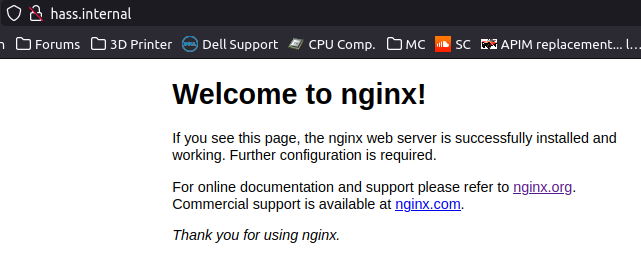
This works just fine, but NGINX is obviously not doing anything at this point.
CA and Self-Signed Cert.
This will be done on my laptop, because I already have OpenSSL installed here. I don’t want to bother installing it multiple places, since I’ll be SCPing the files on my local network only before securing them in their homes.
In general this will happen in 7 steps. Don’t worry, each step is relatively short.
- Generate a randomized private key for our CA
- Create a CA using that key
- Add the CA to trusted list of devices I intend to use it on
- Create a certificate for the domain name
- Sign that certificate with the CA
- Combine the certificate and CA into a full chain
- Deploy the signed cert. on my NGINX machine
1 - Generate the private key for the certificate authority. We’re encrypting it with a passphrase. Otherwise, if someone got access to that file, they could use it to create certificate authorities as if they were me.
I’m giving it a unique name based on my own name, so that I’ll remember it as the root for all of my stuff. I’m replacing that portion with underscores to not doxx myself from here on. Make sure you name these in such a way that you’ll remember what they are. Keeping the names straight is the hardest part in my opinion, since they’re all so similar.
$ openssl genrsa -aes256 -out ___.ca-key.pem 4096
Generating RSA private key, 4096 bit long modulus (2 primes)
......................................................++++
.............................................................++++
e is _____ (0x______)
Enter pass phrase for ___.ca-key.pem:
Verifying - Enter pass phrase for ___.ca-key.pem:
2 - Generate the CA. Most of the fields don’t require you to enter anything.
$ openssl req -x509 -new -nodes -key ___.ca-key.pem -sha256 -days 730 -out ____.ca.pem
Enter pass phrase for ___.ca-key.pem:
You are about to be asked to enter information that will be incorporated
into your certificate request.
What you are about to enter is what is called a Distinguished Name or a DN.
There are quite a few fields but you can leave some blank
For some fields there will be a default value,
If you enter '.', the field will be left blank.
-----
Country Name (2 letter code) [AU]:US
State or Province Name (full name) [Some-State]:____
Locality Name (eg, city) []:____
Organization Name (eg, company) [Internet Widgits Pty Ltd]:____
Organizational Unit Name (eg, section) []:____
Common Name (e.g. server FQDN or YOUR name) []:____
Email Address []:____
3 - Deploy the CA to the machine you’ll be using to administer these sites. In my case it’s this laptop that I’m using.
Debian or derivatives:
$ sudo apt install ca-certificates
//this is probably already installed on your machine

$ sudo cp [the ca.pem file that was just generated] /usr/local/share/ca-certificates

$ sudo update-ca-certificates
Updating certificates in /etc/ssl/certs...
rehash: warning: skipping ca-certificates.crt,it does not contain exactly one certificate or CRL
1 added, 0 removed; done.
Running hooks in /etc/ca-certificates/update.d...

Adding debian:____.ca.pem
done.
done.
Firefox does not automatically use these nowadays, so you will have to add your root CA separately to the browser with “settings” » search for “certificates” » “Certificate Manager” » “Authorities” tab » Import » select your .ca.pem file
Windows:
Just move the .ca.pem file onto your windows machine and open it by double clicking to install it. You can run certmgr.msc to verify it’s presence. Or you should be able to look in Edge settings as well.
4 - Generate the certificate key for the website.
$ openssl genrsa -out hass.internal.cert-key.pem 4096
Generating RSA private key, 4096 bit long modulus (2 primes)
....................................................................++++
...........................................................................................................................................................................................................................................................................................................................................++++
e is _____ (0x______)
5.1 - Create the certificate signing request
$ openssl req -new -sha256 -subj "/CN=fitib" -key hass.internal.cert-key.pem -out hass.internal.cert.csr
5.2 - Create an extfile. This will give alternate names. Sometimes the browser will check these vs the URL, and if there’s a mismatch will throw an error. The point of self-signed certificates is kind of lost if I’m having to add an exception for the website anyways.
$ echo "subjectAltName=DNS:hass.internal,IP:192.168.0.55,IP:192.168.0.54" >> extfile.cnf
$ echo extendedKeyUsage = serverAuth >> extfile.cnf
5.3 - Use the certificate authority and signing request to sign the cert, using the CA. We’ll also verify the certificate against the CA to ensure it was done correctly afterwards.
$ openssl x509 -req -sha256 -days 365 -in hass.internal.cert.csr -CA ____.ca.pem -CAkey ____.ca-key.pem -out hass.internal.cert.pem -extfile extfile.cnf -CAcreateserial
Signature ok
subject=CN = fitib
Getting CA Private Key
Enter pass phrase for ____.ca-key.pem:

$ openssl verify -CAfile ____.ca.pem -verbose hass.internal.cert.pem
hass.internal.cert.pem: OK
6 - Combine the certificate and CA into one file, which is the full chain. This is literally just the two files concatenated together.
$ cat hass.internal.cert.pem ____.ca.pem >> hass.internal.fullchain.pem
7 - Deploy the full chain and private key to the machine that will be using them. I’m just using SCP to move it from one machine to another, since I’m on the same internal network. I’m keeping them out of the /etc/letsencrypt/live directory that letsencrypt uses by default, but I do want to keep them somewhere similar. So I’m creating a /letsencrypt/selfsigned directory to organize them there.
And here’s the initial NGINX configuration file to make it all work. A few changes between my baseline and this are:
- Adding the allow and deny ranges in each server block so only internal IPs will get through. Outsiders should get “error 403 forbidden”.
- TLS files are in a different directory than the normal /etc/letsencrypt/live folder. And I never bothered converting them to .pem files. NGINX can handle .crt and .key just fine.
Spoiler* this doesn’t work quite yet, so don’t copy/paste this into your machine. Remember me saying this was going to be at least 25% discovery learning?
#Home Assistant
server{
  server_name hass.internal;
  location / {
    proxy_pass http://192.168.0.____:____;
    proxy_set_header Host $host;
    proxy_set_header X-Real-IP $remote_addr;
    proxy_set_header X-Forwarded-For $proxy_add_x_forwarded_for;
    proxy_set_header X-Forwarded-Host $server_name;
    proxy_set_header X-Forwarded-Proto $scheme;
  }

  allow 192.168.____.0/24;
  deny all;

    error_log /var/log/nginx/hass.internal.access.log;
    access_log /var/log/nginx/hass.internal.error.log;
    listen 443 ssl;
    ssl_certificate /etc/letsencrypt/selfsigned/hass.internal/hass.internal.fullchain.pem;
    ssl_certificate_key /etc/letsencrypt/selfsigned/hass.internal/hass.internal.cert-key.pem;
    include /etc/letsencrypt/options-ssl-nginx.conf;
    ssl_dhparam /etc/letsencrypt/ssl-dhparams.pem;
}

upstream hass-backend {
  server 192.168._.___
}

#http redirect
server{
  listen 80;
  listen [::]:80;
  server_name hass.internal;
  allow 192.068.____.0/24;
  deny all;
  return 301 https://hass.internal$request_uri;
}
Make sure you have a link into /etc/nginx/sites-enabled, check the config, and deploy the change.
# ln /etc/nginx/sites-available/hass.internal.conf /etc/nginx/sites-enabled/

# nginx -t
nginx: the configuration file /etc/nginx/nginx.conf syntax is ok
nginx: configuration file /etc/nginx/nginx.conf test is successful

# nginx -s reload
Configure HASS
At this point I’m getting error 400. There seems to be a small bit of configuration in Home Assistant to allow a reverse proxy. So let’s try this and see if it resolves my issue.
Get to your configuration.yaml file (in your Home Assistant machine) and add a block. You can use the SSH/terminal add-on, or just SSH into the machine. The file is located at /config/configuration.yaml
# Allow a reverse proxy
http:
  use_x_forwarded_for: true
  trusted_proxies: 192.168.___.___
Troubleshooting Errors
http»https redirect wasn’t working initially, I was just getting the $Welcome to NGINX!" splash screen. I ended up fat-fingering the allowed IP range in the redirect block. So 192.068.x.x needs to be 192.168.x.x
I’m also getting an error 400 ()bad request) for a websocket request in the log.
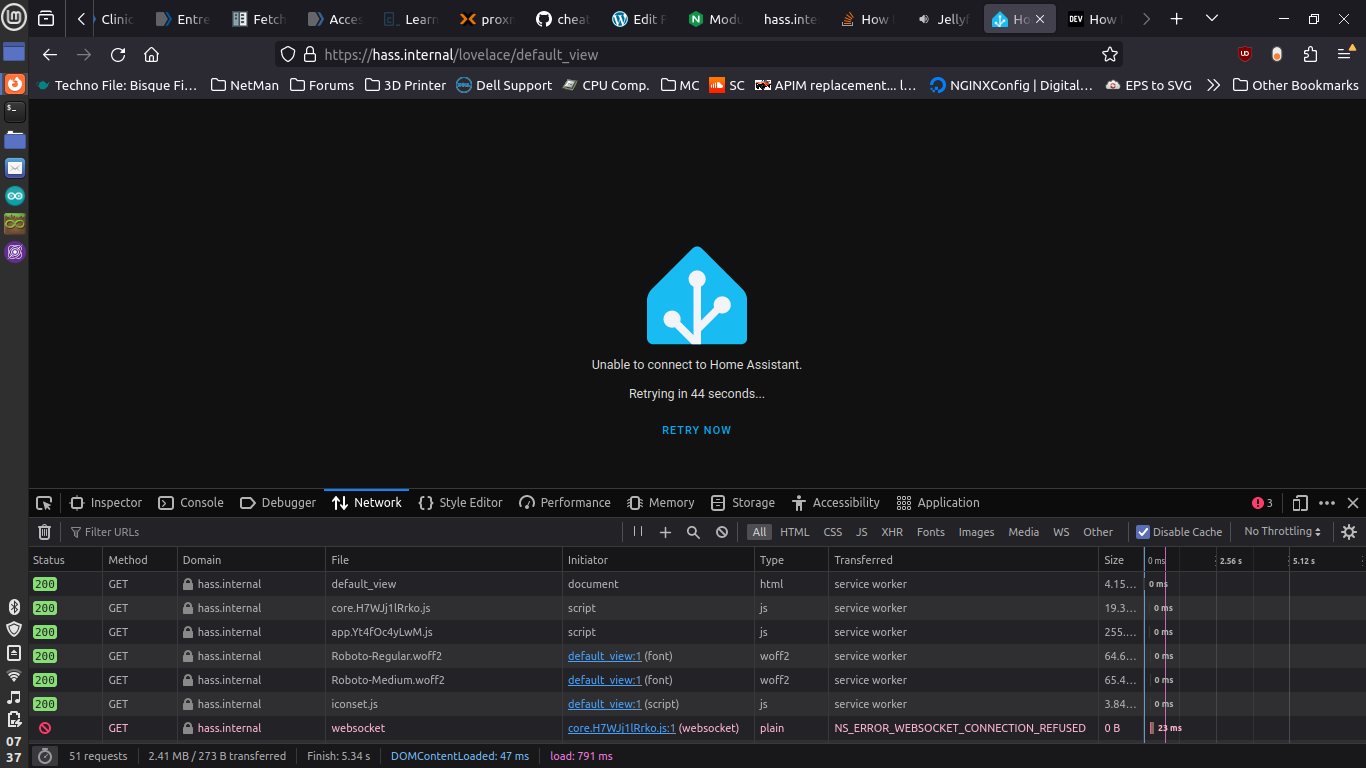
Here’s the error log from nginx, which repeats these 4 lines every minute when it retries.
192.168.0.___ - - [08/Feb/2024:15:11:19 +0000] "GET /lovelace HTTP/2.0" 200 1829 "-" "Mozilla/5.0 (X11; Linux x86_64; rv:122.0) Gecko/20100101 Firefox/122.0"

192.168.0.___ - - [08/Feb/2024:15:11:19 +0000] "GET /hacsfiles/iconset.js HTTP/2.0" 200 3842 "https://hass.internal/lovelace" "Mozilla/5.0 (X11; Linux x86_64; rv:122.0) Gecko/20100101 Firefox/122.0"

192.168.0.___ - - [08/Feb/2024:15:11:19 +0000] "GET /api/websocket HTTP/1.1" 400 66 "-" "Mozilla/5.0 (X11; Linux x86_64; rv:122.0) Gecko/20100101 Firefox/122.0"

192.168.0.___ - - [08/Feb/2024:15:11:20 +0000] "GET /service_worker.js HTTP/2.0" 304 0 "-" "Mozilla/5.0 (X11; Linux x86_64; rv:122.0) Gecko/20100101 Firefox/122.0"
And the log from the HAOS VM.
$ tail -n 3 /config/home-assistant.log
2024-02-08 07:32:50.783 WARNING (MainThread) [homeassistant.components.http.ban] Login attempt or request with invalid authentication from 192.168.0.___ (192.168.0.___). Requested URL: '/auth/token'. (Mozilla/5.0 (X11; Linux x86_64; rv:122.0) Gecko/20100101 Firefox/122.0)

2024-02-08 09:03:02.339 ERROR (MainThread) [homeassistant.components.ipp.coordinator] Error fetching ipp data: Invalid response from API: Timeout occurred while connecting to IPP server.

2024-02-08 09:23:21.338 ERROR (MainThread) [homeassistant.components.ipp.coordinator] Error fetching ipp data: Invalid response from API: Timeout occurred while connecting to IPP server.
Those inputs are not particularly helpful. Just telling me that it’s not a websocket issue, but an authentication issue. So the API isn’t failing because there’s a problem, it’s failing because it doesn’t think I should be served the information. It’s a feature, not a bug.
Final Solution
It turns out that I needed to add ‘proxy_set_header Upgrade $http_upgrade;’ and ‘proxy_set_header Connection “upgrade”;’ in each of the location directives. Originally I had tried adding it to only the /ws location directive.
So here’s the final NGINX configuration that yields a successful connection:
$ cat /etc/nginx/sites-available/hass.internal.conf

# http>>https redirect
server{
  listen 80;
  listen [::]:80;
  server_name hass.internal;
  allow 192.168.0.0/24;
  deny all;
  return 301 https://hass.internal$request_uri;
}

upstream hass-backend {
  server 192.168.___.___:8123;
}

upstream hass-websocket {
  server 192.168.___.___:3000;
}

# Home Assistant main
server{
  server_name hass.internal;

  location / {
    proxy_pass http://hass-backend;
    proxy_set_header Host $host;
    proxy_set_header X-Real-IP $remote_addr;
    proxy_set_header X-Forwarded-For $proxy_add_x_forwarded_for;
    proxy_set_header X-Forwarded-Host $server_name;
    proxy_set_header X-Forwarded-Proto $scheme;
    proxy_set_header Upgrade $http_upgrade;
    proxy_set_header Connection "upgrade";
  }

  location /ws {
    proxy_pass http://hass-websocket;
    proxy_http_version 1.1;
    proxy_set_header Upgrade $http_upgrade;
    proxy_set_header Connection "upgrade";
  }

  allow 192.168.0.0/24;
  deny all;

    error_log /var/log/nginx/hass.internal.access.log debug;
    access_log /var/log/nginx/hass.internal.error.log;

    listen 443 ssl http2;
    ssl_certificate /etc/letsencrypt/selfsigned/hass.internal/hass.internal.fullchain.pem;
    ssl_certificate_key /etc/letsencrypt/selfsigned/hass.internal/hass.internal.cert-key.pem;
    include /etc/letsencrypt/options-ssl-nginx.conf;
    ssl_dhparam /etc/letsencrypt/ssl-dhparams.pem;
}
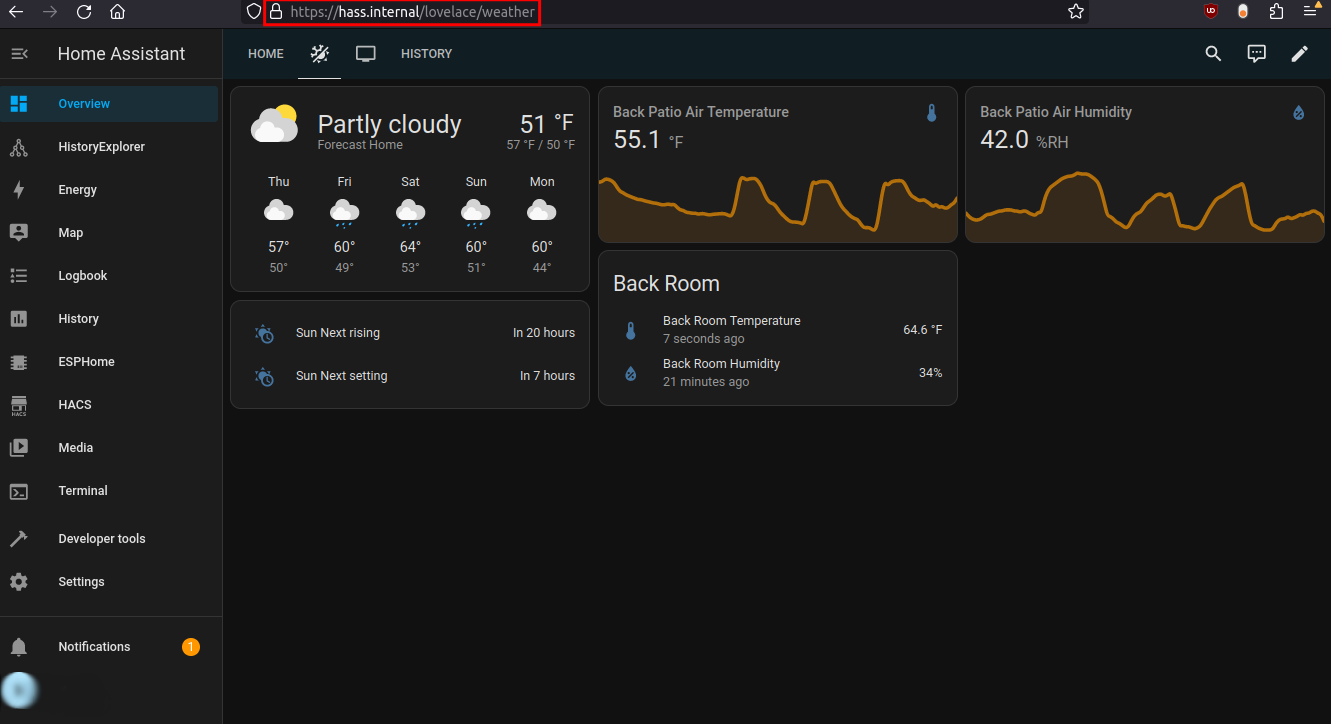
There we go! This took ~3 hours to solve after the initial implementation not working quite right. There are a lot of forum posts about similar issues, but people are generally not using the exact same setup as I am. They’re using NGINX in docker on the same machine as a docker HA instance, the NGINX add-on, etc.
So if you have your infrastructure setup like I do; NGINX on bare metal or a VM, running as a service » HAOS in its own VM or on bare metal. Only wanting to access it internally, and willing to self-sign. This should work for you.
It should also work for many other internal-only services that don’t have a easy way to use your own certs (like Proxmox, where you can copy/paste the cert strings into the GUI, so nice…)