I don’t know that anyone actually follows this blog. But if you do, you’ve noticed that I haven’t posted in months.
I’ve gotten a little sick of Wordpress. Particularly the bloat that comes along with it. Every time you upload a photo it gets scaled down into multiple resolutions. It calls a database to manage all of these files. Every time you view a page it hits the database again to pull all of these files. Check for comments and usernames on comments. There are thousands of plugins, a lot of them paid, some of them free, or free with paid features. The pages are bloated and hard to render, as well as taking a long time to load while you wait for db queries on the backend. There are constant updates to plugins (seriously, why does jetpack need to update every 2 days? It’s certainly not for features that I or most average users need). The list is extensive.
So I’ve been busy with the new house, but holding onto my thoughts because I didn’t want to keep feeding the WP beast and make migrating even more difficult in the future. Something about the sunk cost fallacy…
I’ve finally decided to use Hugo, a static site generator that works by rendering markdown files into html. I’ve created a new LXC container in Proxmox, installed Hugo, and brought in my export .zip file from the old site. Tried out a few themes, and made sure everything works. Then spent a few days going through individual posts, which did not all come through as expected. But we’ll fix that later.
Export Content from Wordpress
I’m using the WordPress to Hugo Exporter plugin in WP. It’s free and quick to install. It ended up crashing a few times at first. I had to add some cores and RAM to the virtual machine running my WP instance. There is no/minimal output, so the WP site will hang and stop rendering files for a while once you hit “go”. The VM will show the processor pegged, RAM maxed out, and be unresponsive on the console. I ended up with ~2.5GB worth of backup repository, and I think it took 5-10 minutes to run.
With docker, you end up with a file called wp-hugo.zip in the /tmp directory. I’m on docker, and don’t have that directory mapped to the host filesystem, so we’ll have to get it out where it’s usable. You can do this a few ways.
Use the docker command to copy the file to host, then put it where you need. I’m using SCP into the new machine I’m migrating to.
sudo docker cp [WP container name]:/tmp/wp-hugo.zip

scp ./wp-hugo.zip user@host:[desired final location]
or go into the container and move the file to a known direcotry that’s persistent because you mounted it in your compose file. I have
volumes:
      - ./html:/var/www/fitib.us
in my compose file. So this would work:
$ sudo docker exec -it [WP container name] /bin/bash

mv /tmp/wp-hugo.zip /var/www/fitib.us/
exit

$ scp [location of docker files]/html/wp-hugo.zip user@host:[desired final location]
Install Hugo and Create site
I’m using a LXC container in Proxmox. Pretty easy on a Debian based distro and doesn’t require special package managers like snap
$ sudo apt update
$ sudo apt install hugo
$ hugo version
$ hugo new site [name of your site]
This will create a folder in the working directory with the name of your site that you just entered, along with the required folder structure to get started.
root@hugo:__/fitib# ls
archetypes  assets  content  data  hugo.toml  i18n  layouts  manifest.json  public  resources  static  themes
Install Theme
Find a theme here. I’m using Hermit-v2, which I think requires hugo v0.140.0 or above, which we checked earlier.
Follow the instructions for your theme. Hermit-v2 requires one pull command.
git clone https://github.com/1bl4z3r/hermit-V2 themes/hermit-v2
Edit Hugo Config File
Hermit-v2 has its own example config file to replace hugo.toml. I never compared them side by side. Just grab the example and roll with it.
root@hugo:__/fitib# mv ./hugo.toml ./hugo.toml.original
root@hugo:__/fitib# cp ./themes/hermit-v2/hugo.toml.example ./hugo.toml
root@hugo:__/fitib# nano ./hugo.toml
I’m not going to go through the entire config file. You generally are just setting up the title of your site, author name, etc. But here are some items that I needed to put some thought into. No guarantees these are correct for you. But they work for my setup with NGINX consolidated on one machine, and Hugo running standalone with its own Apache2 serving from the LXC container.
-
baseURL = "/"Based on documentation, this should be the entire protocol, URL, and trailing slash. But “https://fitib.us/" did not work for me at all. I was getting my site, but not any of the .css loading. If you happened to try and look at this site for ~12 hours right after I switched, you probably saw something very ugly. So I think the .css file needed was messed up due to an incorrect local path. -
publishDir = "/var/www/fitib/"By default Hugo will publish to ./public/ in whatever directory the site is initialized in. You can then grab everything in ./public and move it to /var/www/[your site name]/ or whatever directory your system needs the files in. But I don’t like extra steps. So after validating that it worked, I’m just publishing to the correct directory initially. We can still test before publishing, covered in the next topic below. -
Markup
[markup]
  [markup.goldmark]
    [markup.goldmark.extensions]
      [markup.goldmark.extensions.passthrough]
        enable = true
        [markup.goldmark.extensions.passthrough.delimiters]
          block = [['\[', '\]'], ['$$', '$$']]
          inline = [['\(', '\)']]
I had a few old posts that are using LaTeX and would like them to keep working. So uncomment this block if needed. At this point in time I need to go do a little bit of cleanup with the delimiters to get those working again. But don’t anticipate any issues, just being lazy.
-
code_copy_button = trueAny inline or block code shows up nicely with a scroll bar if it’s too wide for the browser. But sometimes is difficult to copy with a cursor without missing a leading or trailing character. So this just adds a button to add the contents to your clipboard easily.
  [[menu.main]]
    name = "Posts"
    url = "posts/"
    weight = 10

  [[menu.main]]
    name = "About"
    url = "about-me/"
    weight = 20
If you don’t have an about-me page, or want to add additional items to the top level of your menu, this is where to do that, and what the url (and markdown filename) will be.
Create a Post and Test
Now we create a simple markdown file to test out that Hugo is working as expected.
$ hugo new content content/posts/test-post.md
This creates ./content/posts/test-post.md with front matter auto-populated. Add a few lines, and we’ll make sure it publishes as expected.
+++
title = 'Test Post'
date = 2025-05-03T07:07:07+01:00
draft = true
+++
This is a draft post in *markdown*. **This text should be bold.**

* Bullet 1
* Bullet 2
  * Bullet 2.1
  * Bullet 2.2
*Bullet 3

[Link to google.](https://www.google.com)
Now we test things out. You’ll need to change the draft flag to false, or add either -D or --buildDrafts flag to your argument. Hugo will build the site, and watch for any changes. Automatically rebuilding individual pages as needed. It then hosts it locally.
hugo server --bind "0.0.0.0" --port "8080" --baseURL "http://192.168.0.29:8080" --disableFastRender --cleanDestinationDir
-
--bind "0.0.0.0"allows anyone to be served a page. Normally you would run this command on a computer with a GUI, and then go to http://127.0.0.1 or http://localhost in your browser. But I’m doing this on a virtual host, and accessing it from my laptop to test. So let’s not block ourselves. -
--port "8080"Port 80 and 443 are already bound by Apache2 service on this host. So we have to pick something else that doesn’t conflict. -
--baseURLJust matches the two options above. I’m not sure if this is strictly required. But it was referenced a few times, so why not stick with the documentation? -
--disableFastRenderand--cleanDestinationDirto make sure I start with a clean slate. At one point I was having problems with old unreferenced files being present (e.g. after deleting a test post, and then ./public/posts/test/index.html still exists). At the very end, with lots of pages and photos, it was taking ~5 seconds to build the full site even with these flags. So worth it for the peace of mind as I was fighting other issues.
And here’s what you ultimately get:
Finish Converting Posts if Necessary
The WordPress to Hugo conversion did a few things that needed to be cleaned up.
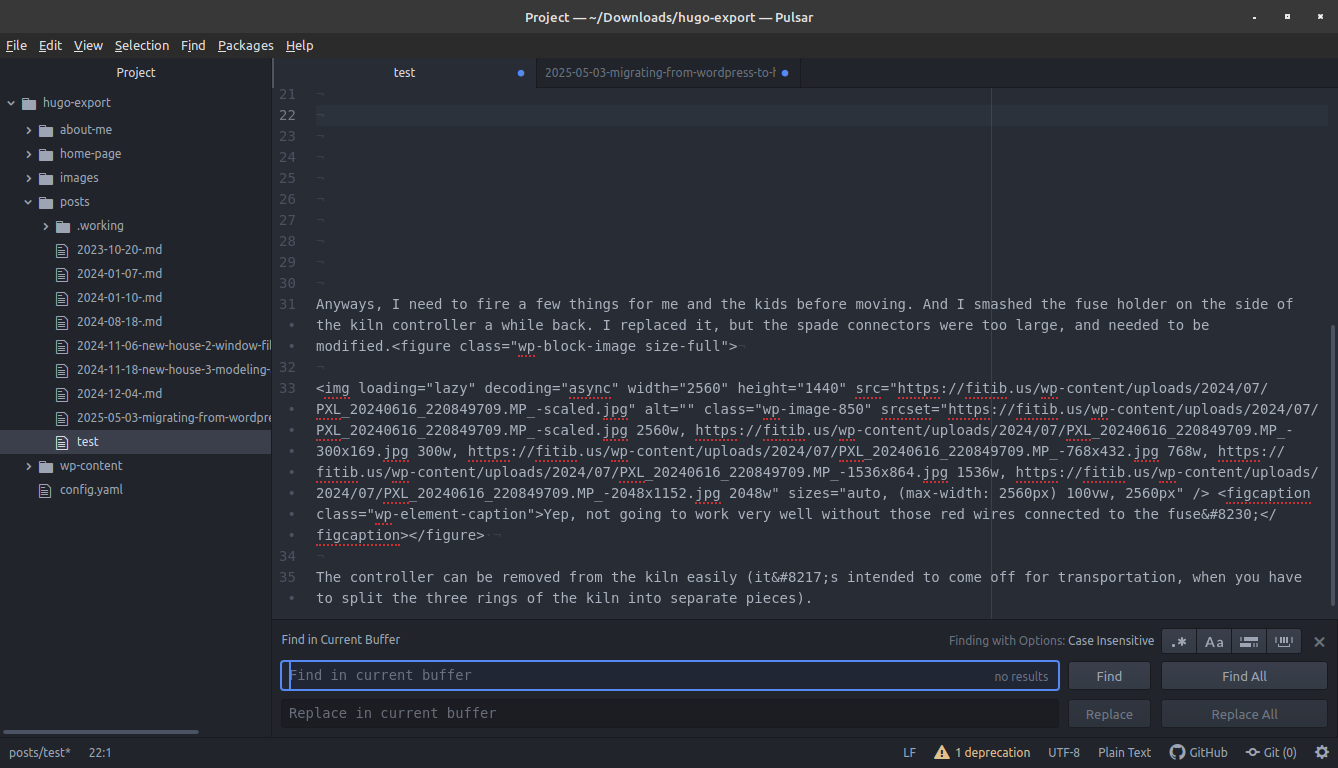
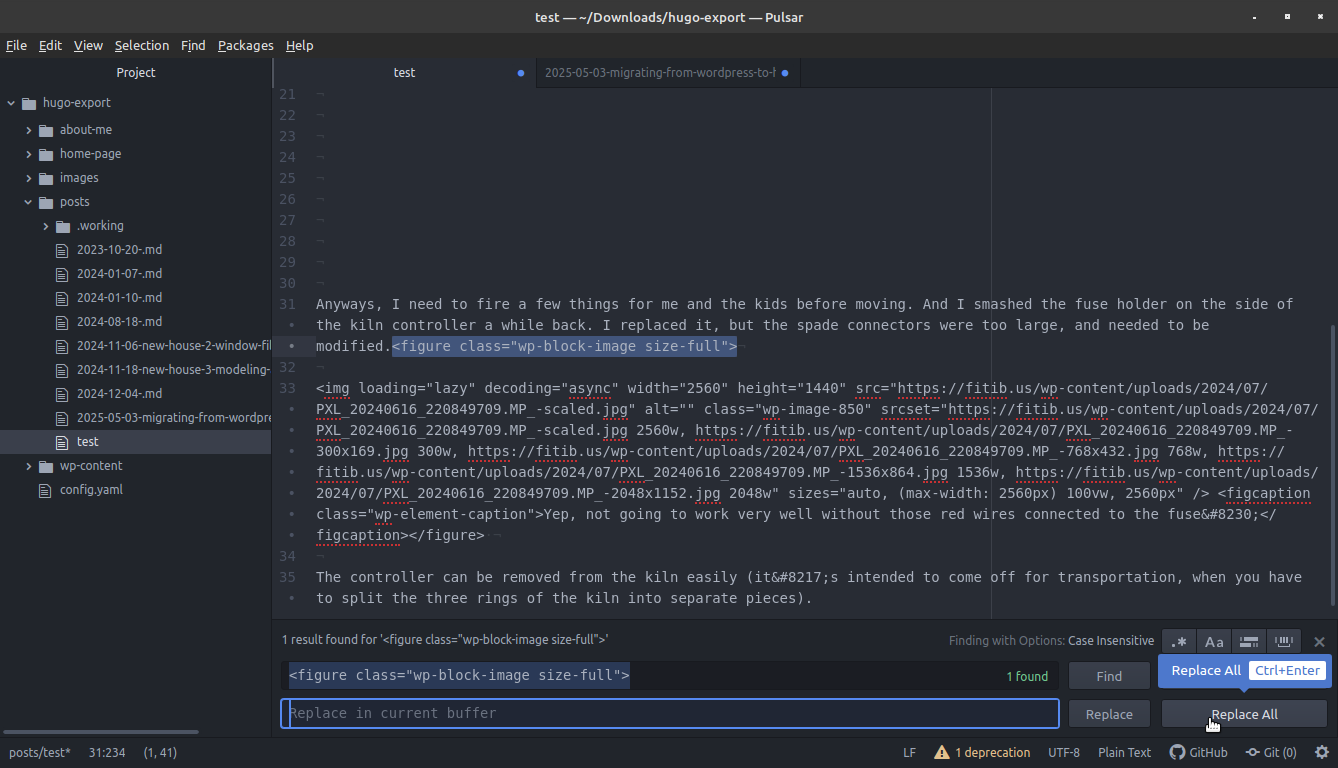
Special characters are mostly converted to avoid triggering formatting in Hugo’s markdown renderer. E.g. all apostrophes are replaced by $#8217;. I had code blocks in WP where an opening square bracket was changed to a unicode number, but the closing square bracket wasn’t. I’m using Pulsar as my editor for almost everything, so it was easy to find/replace all instances of these. Some items like en-dash, em-dash, elipses, etc. were just left alone. But every single ’ in the middle of a word being replaced by alphabet soup kills my readability when editing.
Some WP block types aren’t recognized. The more complicated they are, the more there is to parse through and edit out. A simple list doesn’t show up for some reason. If you had to download WP plugins to get special blocks, you’ll almost certainly have to pull them apart piece by piece yourself. As I started adding things, like lightbox for image zooming, the decomposition process became more and more involved.
E.g. a simple html list created by the WP block editor:
<ul class="wp-block-list">
  <li>
    1) Windows are rotting, and probably not flashed.
  </li>
  <li>
    2) Rafters were not attached properly, and ended up splitting.
  </li>
  <li>
    3) Insulation in the attic is thin.
  </li>
There are only one or two lists in each post, so it’s faster to just select with the mouse and delete what you don’t need. Then rebuild by copy-pasting the missing markdown bits.
You get lots of raw html leftovers from WP. Hugo by default will just ignore them when rendering for security. But gives you a WARN level message when building. So find/replace these out of the document entirely. E.g. ## 1: Rotten Windows {.wp-block-heading} everything in the curly braces.
The images took most of my time. WP was storing images in the folder wp-content/uploads/[yyyy]/[mm]/image.jpg. You can also see that there were a ton of extra files with -[width]x[height] appended to the image filename.
I don’t like a whole month worth of photos in one folder. And I hate the bloat. So we’re going to go with [hugo site root folder]/images/yyyymmdd/image.jpg instead. Each post compartmentalized into its own folder. There wasn’t much to do besides delete anything with the dimensions appeneded in the filename, then manually create the folders with dates matching the post dates, and start dragging and dropping.
Once that’s done, We can actually get a link in markdown to the correct individual file. in the format 
My Site structure (excerpt)
root@hugo:___/fitib# tree -L 3
.
|-- archetypes
|   `-- default.md
|-- assets
|-- content
|   |-- about-me.md
|   `-- posts
|       |-- 2022-10-19-hello-world-2.md
|       |-- 2023-08-07-migrating-to-proxmox.md
|       |-- 2023-08-29-the-joys-of-homelabbing.md
|-- data
|-- hugo.toml
|-- i18n
|-- layouts
|-- manifest.json
|-- public
|   |-- 2022
|   |   `-- 10
|   |       `-- 19
|   |           `-- hello-world-2
|   |               `-- index.html
|   |-- 2023
|   |   |-- 08
|   |   |   |-- 07
|   |   |   |   `-- migrating-to-proxmox
|   |   |   |       `-- index.html
|   |   |   `-- 29
|   |   |       `-- the-joys-of-homelabbing
|   |   |           `-- index.html
|   |-- css
|   |-- en
|   |-- images
|   |   |-- 20230807
|   |   |   |-- pve1.png
|   |   |   |-- pve2-wpp1697039940778.png
|   |   |   |-- pve2.png
|   |   |   |-- pve3-wpp1697040008882.png
|   |   |   `-- pve3.png
|   |-- index.html
|   |-- js
|   |-- robots.txt
|   `-- sitemap.xml
|-- resources
|   `-- _gen
|       `-- assets
|-- static
|   `-- images
|       |-- 20230807
|       |   |-- pve1.png
|       |   |-- pve2-wpp1697039940778.png
|       |   |-- pve2.png
|       |   |-- pve3-wpp1697040008882.png
|       |   `-- pve3.png
`-- themes
    `-- hermit-v2
        |-- LICENSE
        |-- README.md
        |-- archetypes
        |-- assets
        |-- hugo.toml.example
        |-- images
        |-- layouts
        `-- theme.toml

100 directories, 49 files
- post-title.md gets created in /content/posts
- image folder gets created in /static/images/yyyymmdd/ and filled with individual images, .zip files, etc.
- site gets built
- .html, images, and necessary files from themes get put into /public (and/or the directory you specified in the hugo.toml file earlier)
Side quest: re-learn regular expressions because you don’t use them often
 How it started
 Delete the raw html fragments left behind
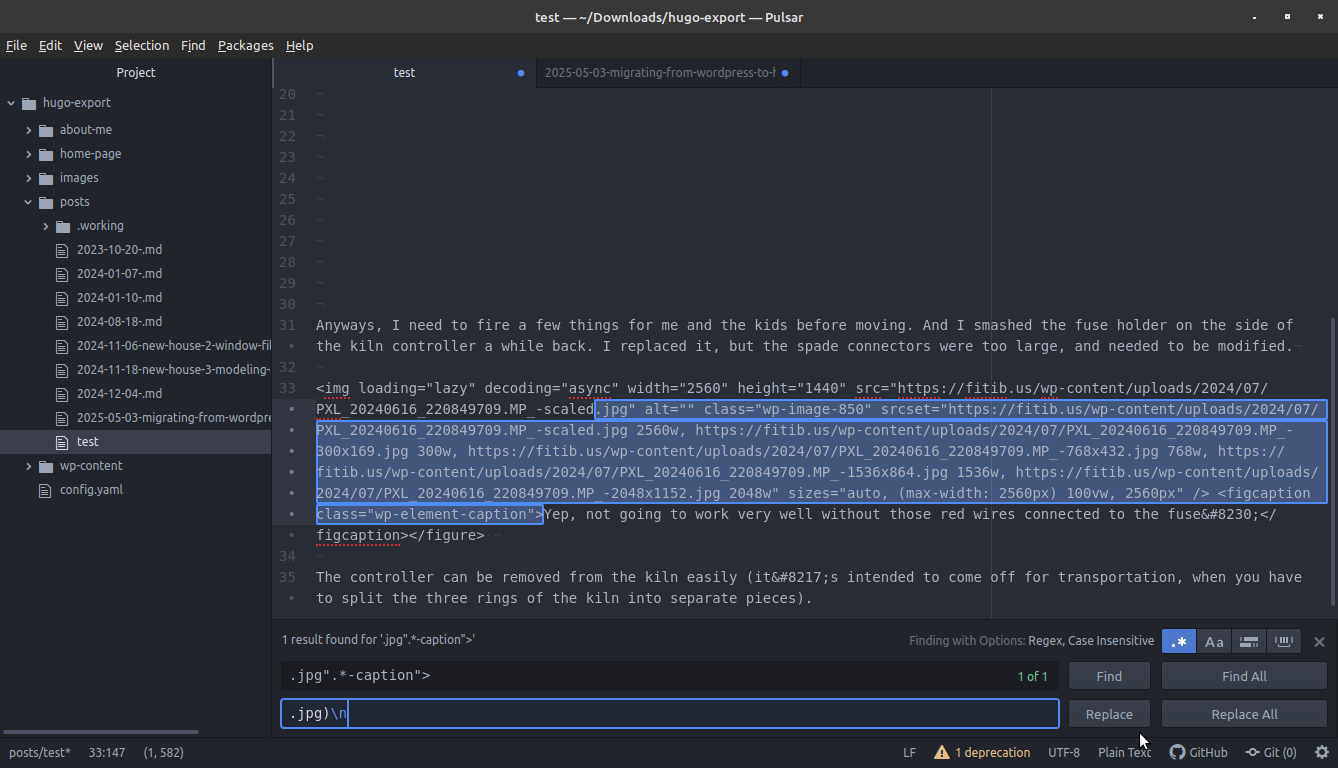 Use some regex to find the first .jpg or .png instance, and delete everything after it up to the line break. But don’t delete the image comment that was part of the WP image block. If you’re unfamiliar with regex this means (find the string .jpg”)(find anything in between with .*)(stop once we see -caption">). Make make sure to replace .jpg, cap it off with a bracket, and add a newline character.
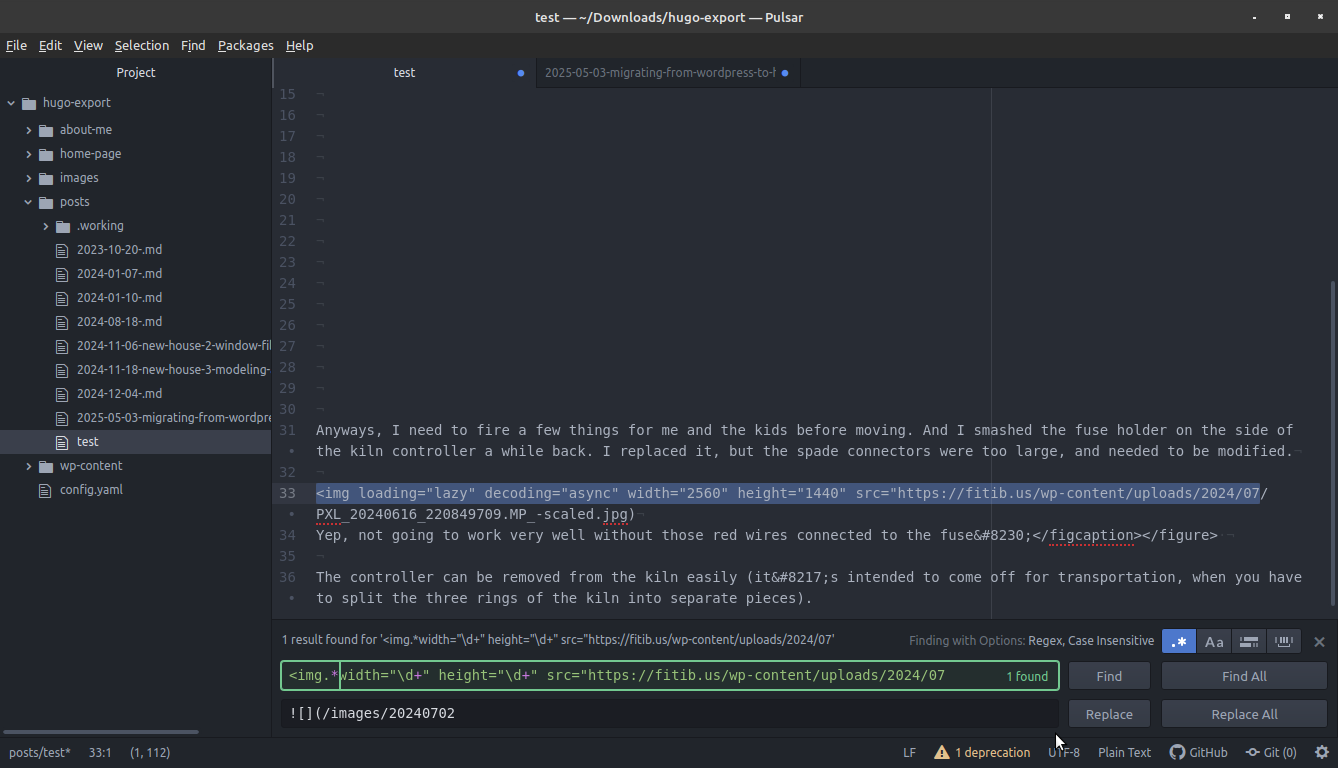 Here we’re getting the beginning format of the markdown link correct. Just selecting everything up to the last slash of the path, and replacing it with the prefix and new folder that I created. Images will generally be different dimensions unless they’re all screenshots from the same source. So replace the digits in
 width and height fields with \d+ meaning, one or more numerical digits.
 Final product for each image block. And getting my apostrophes back!
Ok, that is painful. I did this one page at a time on my laptop where I had the entire backup and new site locally for now.
- Modify post.md file on laptop
- Copy post to correct directory on the host
- Copy image folder onto the host
- Generate test site on the host
- View test site on laptop, compare to old site for missing images, etc.
I moved posts and images into “.working” folders once complete to keep my workspace clean and avoid slipping further into insanity.
Deploy the site
First I had to make a new folder in /var/www for Apache to use. Make a quick index.html test page. Create the Apache config file in sites-available, and symbolic link to sites-enabled. None of that is particularly difficult.
# mkdir /var/www/fitib.us/

# cp /var/www/html/index.html /var/www/fitib.us/

# nano /etc/apache2/sites-available/fitib.us.config

# ln -rs /etc/apache2/sites/enabled ../sites/available/fitib.us.conf
I’m not going to show the entire apache2 config file. There are only a few settings, and they’re pretty simple. More info can be found in the docs. I am making this port 80 (NGINX on another VM is handling SSL, and I don’t care about unencrypted traffic between 2 virtual hosts in my own home network). Switch the default site to some other port, or do like me and just delete the default site in /var/www/html
# a2ensite fitib.us.conf

# a2dissite 000-default.conf

# rm -r /var/www/html

# systemctl reload apache2
Now we should connect to the server by IP address in the browser and be able to see the Apache landing page to verify everything works. Or curl http://localhost:80 from the terminal of that machine.
Finally, we’re ready to build and get the files where they need to be.
[back in the working directory of the hugo site]

root@hugo:___/fitib# hugo --logLevel debug
Start building sites …
hugo v0.145.0-666444f0a52132f9fec9f71cf25b441cc6a4f355+extended linux/amd64 BuildDate=2025-02-26T15:41:25Z VendorInfo=gohugoio

INFO  build:  step process substep collect files 32 files_total 32 pages_total 31 resources_total 1 duration 2.132248ms
INFO  build:  step process duration 2.251967ms
INFO  build:  step assemble duration 11.91457ms
DEBUG Write redirect to main language en: /en/
INFO  build:  step render substep pages site en outputFormat html duration 277.133576ms
INFO  build:  step render substep pages site en outputFormat rss duration 36.186426ms
INFO  build:  step render pages 377 content 203 duration 313.872053ms
INFO  build:  step render deferred count 0 duration 1.367µs
INFO  build:  step postProcess duration 9.262µs
INFO  build:  duration 328.292679ms
INFO  static: syncing static files to / duration 5.164967148s

                   | EN
-------------------+------
  Pages            | 377
  Paginator pages  |   0
  Non-page files   |   1
  Static files     | 577
  Processed images |   0
  Aliases          |   1
  Cleaned          |   0

Total in 5181 ms


root@hugo:___/fitib# cp -r ./public/* /var/www/fitib.us/
The final step, for me, is to point NGINX at the new upstream server. I first had WP running in docker on the same VM as NGINX. So I’m just going to the upstream block of my NGINX config, and changing 127.0.0.1:[whatever port I originally used] to 192.168.0.xx:80. I really prefer Proxmox over my first experience with homelabbing on a single machine and docker for everything. Creating a container or VM with its own IP address and console access just makes more sense in my head.
Final Thoughts:
The last step above is not necessary anymore. I did ammend my config portion above to include the build directory in /var/www. So when I build the site it gets automatically put in the /var/www/fitib folder where it needs to be. I’ll just need to make sure to test the site first, so that if there are any errors I catch the breaking changes before overwriting the actual files in place.
I forgot to change image paths on the featured image portion of the front matter on most posts. So I need to clean those up. There doesn’t seem to be any check during build to make sure links and images (even just local ones) actually point to files that exist in the filesystem. There are some link checker tools that exist, but I’m not sure if I want to mess with them. It is probably easier moving forward to just be thorough before commit on new posts, and have a backup plan.
 I have no logs anymore. I previously had the Jetpack WP add-on, and obviously don’t get any data since migrating. I have NGINX setup to generate separate access and error logs. So I need to make sure they’re compatible with Goat Counter and use that instead. Bonus points if I can get the existing logs imported for better continuity, and setup a maximum age of 90 days before purging the raw data.
Note: I guess keeping access logs is a privacy concern for you, the reader. Know that I only use them to determine what kind of content people like. E.g. my Subaru tumble generator valve (TGV) post is by far the most popular, so I’m trying to do more car repair posts in the coming months as my daily driver gets older and needs repairs of increasing obscurity.
The new machine in the Proxmox cluster is a mini PC with a spare old HDD. So I think I’m going to test performance before/after getting the entire site to load into ramfs on boot.
In some ways I already miss the block editor of WP. It’s nice to render in real time and see the images along with the text. There’s probably a way to do that in Pulsar, but I don’t know if it’s worth it. I do love the smaller attack surface of a static site, lack of required updates, etc.