Overview
It’s currently cold outside, and a winter storm is going to cover most of the continental United States in a few days. People are trying to do last minute insulation placement to try and stave off the cold, or are feeling the pain already and trying to plan out some upgrades for spring to make next winter more bearable.
I have responded to two threads on Reddit r/insulation and r/buildingscience in the last week, specifically talking about how to lay out insulation batts in your attic. Specifically, me telling people to stagger them in both x and y directions, and someone chiming in that “you should also stagger them in the z direction!”
This. Makes. no goddamn sense. Seriously. None.
So let’s take a look at why. I used SolidWorks to create some graphics yesterday. I’m an engineer, not a graphic designer. So bear with me. This is what makes sense in my head. I don’t have fancy animations to show how air actually flows through these leak paths that I’m about to show.
Maybe someone can suggest something better. I’m all ears. You can reach me over on BlueSky. I don’t do WordPress anymore with a comments section. Static web pages only, sorry.
Primer
Adding heat to a material requires energy. Getting your car to go faster requires adding energy. Energy of a system is equal to \\(1/2*mass*velocity^2\\). So it makes sense that heating something up at a very low level just makes the molecules vibrate faster. Ok? If a particle is hotter, it’s moving faster. If it’s moving faster, when it collides with another particle, the change in momentum between them is more drastic.
Heat transfer is the study of how energy flows from one material to another, within the same material, and across interfaces of different types. That’s my own definition. I actually went back and looked at my old textbook, Heat and Mass Transfer - Fundamentals & Applications. 4th ed. - Cengel and Ghajar, and the definition in the preface was overly broad: “Heat and mass transfer is a basic science that deals with the rate of transfer of thermal energy. It has a broad application area, ranging from…”
So I’ll try and break this down into things to a high school level of understanding. Heat Transter manifests into three mechanisms.
-
Conduction. If I have a block of metal at 100C, and another at 0C I can put them against one another. The molecules in the hotter aluminum block are vibrating fast (but not so fast that the intermollecular bonds break, and it becomes liquid). When a hot Al atom vibrates, it will eventually come into contact with a cold Al atom from the other block. When they collide, some momentum is transferred (like playing billiards). Now the hot atom springs back towards its own block, but slower (colder). And the cold atom springs back towards its own block, but faster (hotter). Energy flows through a block, or across the interface of two blocks, because they’re touching.
-
Convection. Air outside is cold. It touches your window, which is slightly warmer. When it touches, it gains some heat energy from your house, and the air molecules vibrate faster. Because it’s a gas, the molecules hitting each other with more momentum means that they want to push each other apart. So the gas expands. 1.29kg of air at standard temp. and pressure (STP, or 0 celsius and 1 atmosphere of pressure) takes up 1 cubic meter of space. It now rises to 20C. Its density has gone down as it expands, and the same 1.29kg now takes up 1.07 cubic meters.
The warm air at lower density rises, and new air needs to take its place. That new air filling the vacuum is cold, because it came from the bulk air in your back yard. It in turn heats up and rises, leaving a new vacuum of air to be filled. This is called “natural convection”. Different from “forced convection”, which is what happens when your computer fan pushes cool air over its heat sink to keep your processor from overheating.
- Radiation. A fire burns hot. You stand near the fireplace, and feel warm. You’re far enough away, that all of the warm air is flowing up towards the ceiling because of natural convection. But your jeans still feel too hot to touch. This is because the coals are glowing red. They’re emitting infrared radiation outwards through space. Those photons hit your jeans, and aren’t reflected, they’re absorbed. These impart energy to the cotton, and make it warm. This is the same way the sun heats the earth, even though there’s a vacuum of space between us. There’s no air in space to carry heat energy to us through conduction or convection. Radiation energy flies through space until it finally hits our atmosphere and starts to be absorbed.
What we’re dealing with
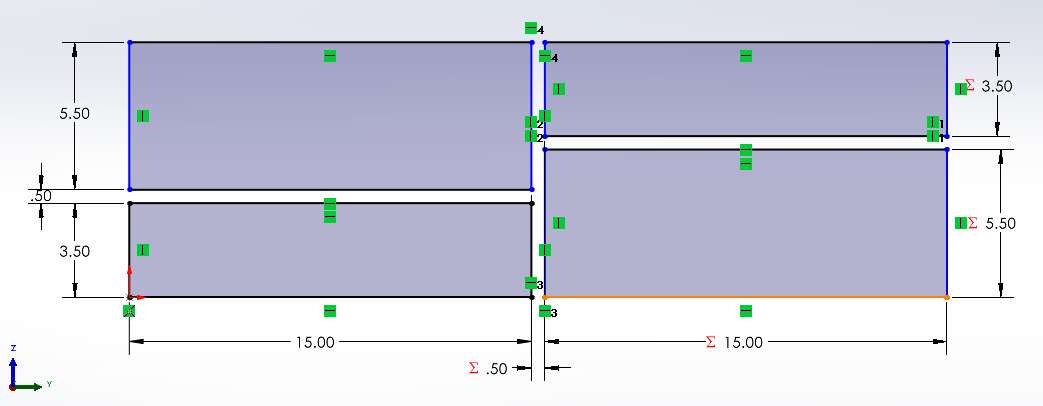
I’ve drawn up some insulation batts as solid bodies. For scale, these are 8’ long batts, intended for 2x6 framing (5.5" thick), and ceiling joists 16" on center. For those not familiar with construction, a 2x6 is actually 1.5"x5.5". 16" on center (OC) means the gap between two joists is 14.5" wide. The insulation batt is slightly too large, so when you press it into place there’s some friction on either side that helps hold it up (and prevent air gaps).
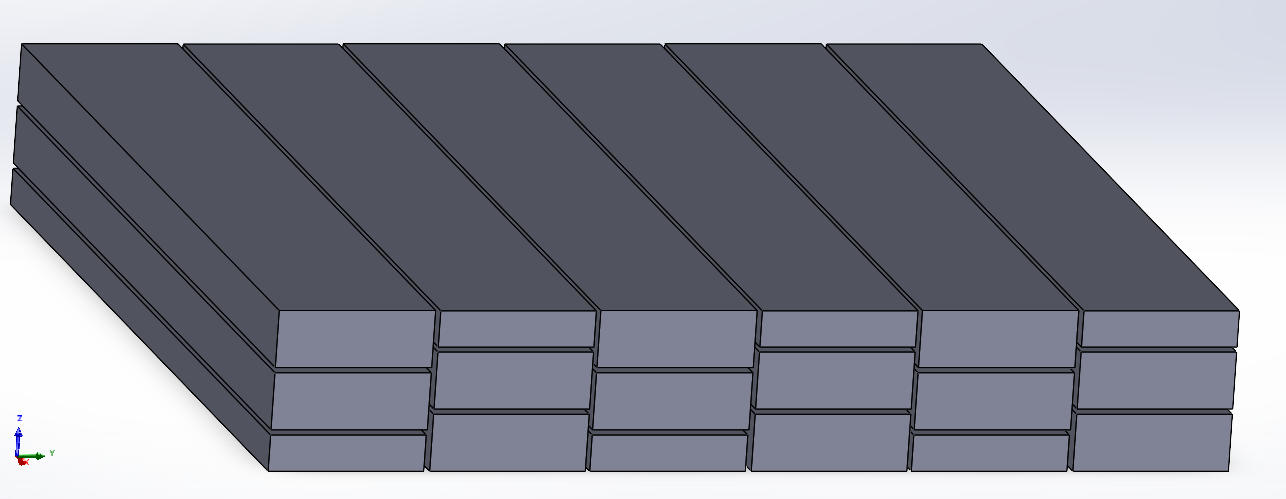
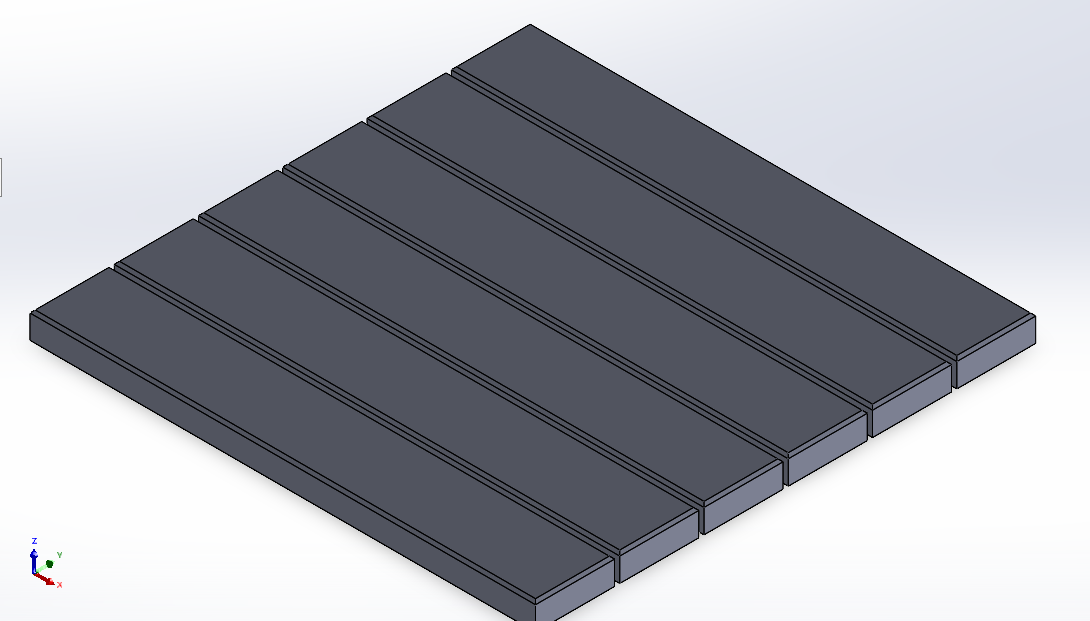 A single layer of batts. I added some chamfers on the edges just to make visualization of multiple layers stacked a little easier. Insulation batts are perfect rectangular prisms in real life.
Ok? So these are 15" wide, with 1" gap between them. The 2nd and 3rd layers of attic insulation won’t be squished and I’m drawing each layer consistently, as a 8’x8’ square.
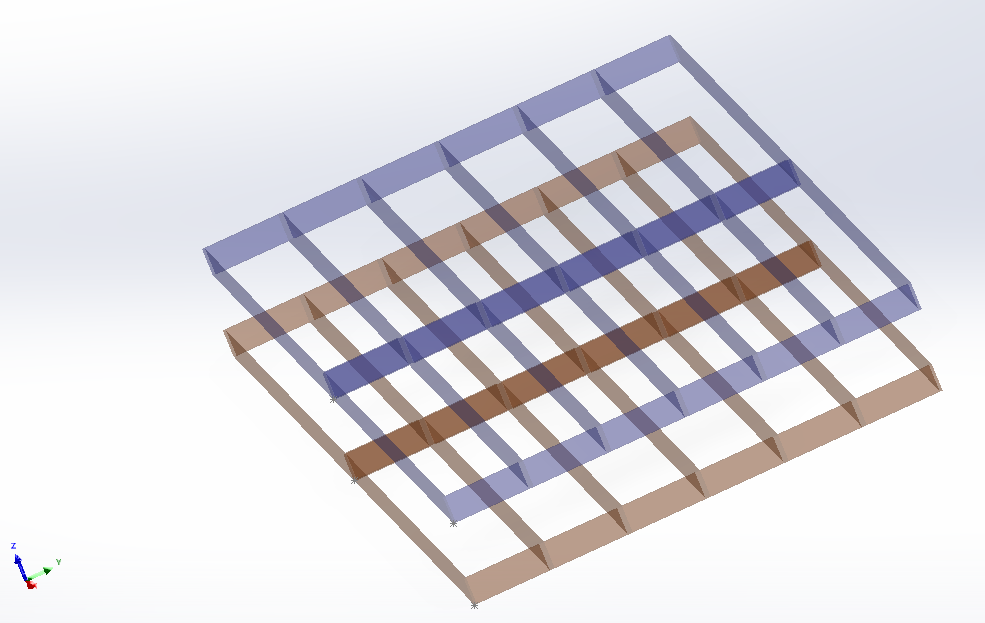
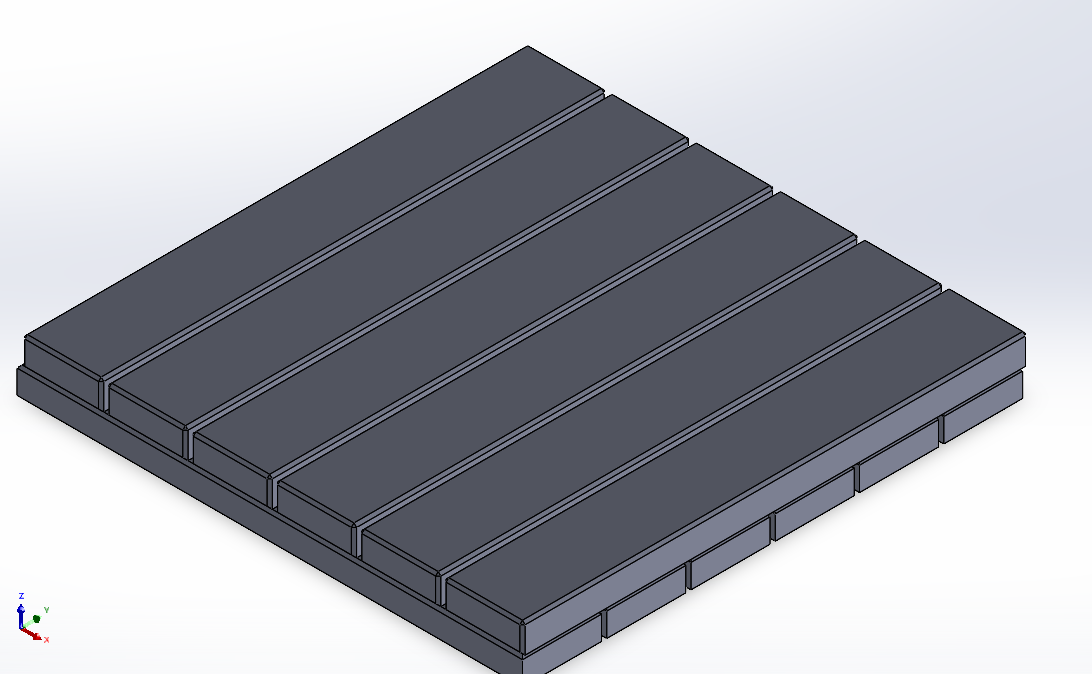 Here’s what it looks like when 2 layers are stacked, with the second rotated 90 degrees relative to the first (around the z axis).
And here’s what the dead space between the batts looks like. The long way, on each side of a batt, there’s a 1" wide gap that is 8’ long and 5.5" tall. Along the edges of the entire 8’x8’ assembly, the gap is only 1/2" wide. Because when you start stacking up assemblies larger than 8’, you end up picking up the additional 1/2" on the next assembly. Make sense?
How insulation works
Insulation primarily works by limiting air’s ability to move. That is, we want to limit natural convection. An empty attic will have crazy convection currents. Air gets warm against the top of the ceiling drywall, then goes straight up. Presumably to a vented ridge. Then cold makeup air comes in from vented soffits/gables, or just leaks in the rest of your house. Eventually you get so much air drafting through your house assembly, that there’s noticeable velocity to it. This is bad
In fiberglass batts, the air has trouble flowing quickly. It gets some velocity upward, then it hits a fiber of glass and has to change direction to avoid it. This slows the air. It’s the same reason we wear N95 masks, the same reason your furnace air filter works, the same reason construction sites put up erosion fences or long tubular rolls of straw to keep mud from flowing into streams. Just a different fluid, and different particulates. Watch this to learn more about the path the air actual takes as it moves, around the 2:15 mark of the video.
Also, for a large assembly temperature shouldn’t change through the thickness. I.e. the entire house is 70F, so the bottom most surface of the insulation will be close to 70F. The entire atmosphere is 32F, so the top-most layer of insulation where it touches attic air will be 32F. Halfway through the thickness, it should be 51F. Whether that’s over the master bedroom, the kids bedroom, the stair landing, etc. It should be fairly consistent in a perfect world (without leaks around lights, attic access stairs, etc.)
E.g. look at this picture. The color represents temperature, red=hot, purple=cold. The color changes as we traverse the thickness of the wall assembly. It generally doesn’t change as we move up/down or left/right in the wall.
 Image courtesy of Hennebery Eddy with some useful information here
A gap between batts allows warm air to easily flow straight upwards without restriction. If we can force the air to change directions, it will slow down. Just like when you drive down the road and come to a T intersection (from the base) you slow down or stop before making the turn. At least I hope you do (I’m not the cops, so I don’t want to hear about what you do in your free time).
Staggering methods
Ok, let’s get into it already!
No offset between layers
 This is the stupidest method of putting in multiple layers of insulation batts.
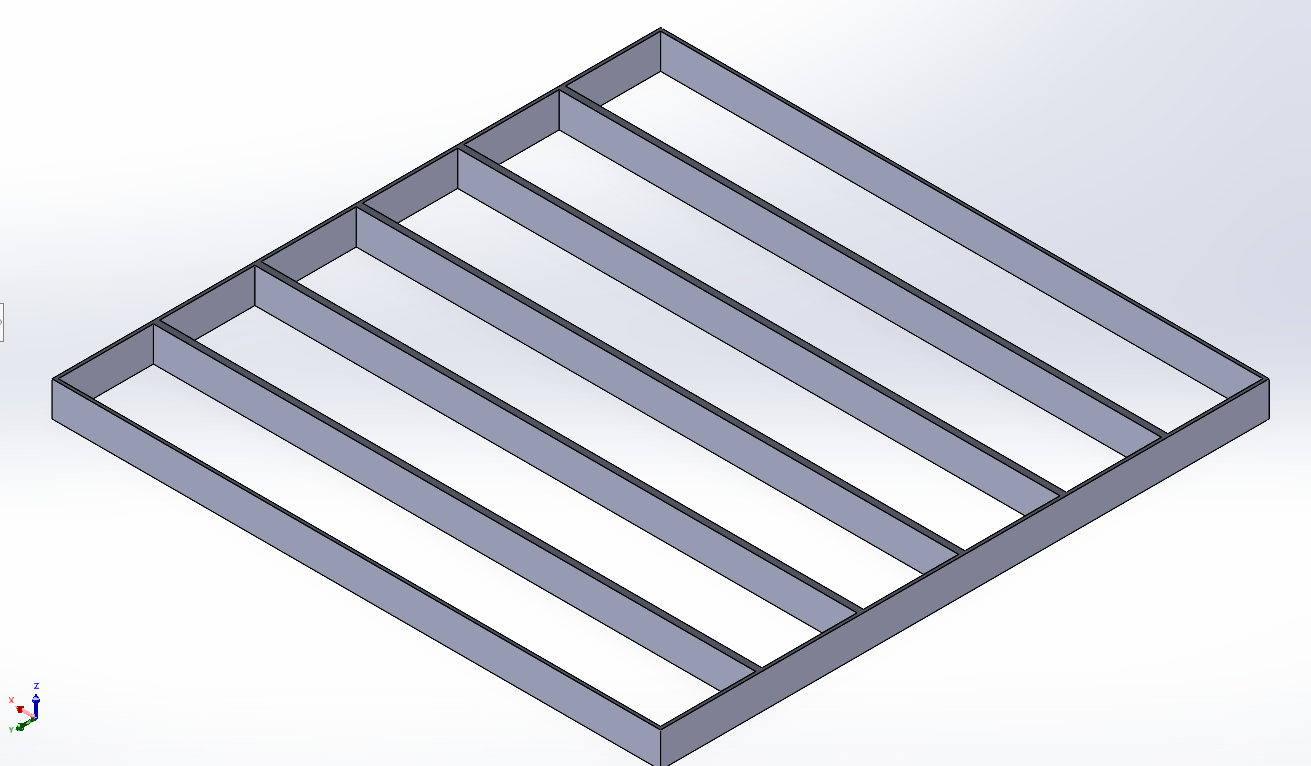
 This is what the dead space looks like between them.
I’ve made the dead space on the bottom red-brown, because it’s warmer. The dead space on the upper layer is blue, because it’s colder. Mostly the color difference will help differentiate between the two as it gets messy.
It’s not perfect, because SolidWorks is designed for technical drawings, not pretty animations. But I’m not doing this all a second time in Blender, or some other software package. Use your imagination.
So the way we’re evaluating these is by looking straight down. If you can see all the way through the assembly to the ceiling below, that’s an area that counts against us. Those are areas where the air flows straight through the assembly from ceiling to open air in the attic unchecked.
So from top to bottom, we have a total of 666 square inches of essentially raceways for the air to flow. That’s 4.6 square feet out of every 64 square feet of ceiling coverage!
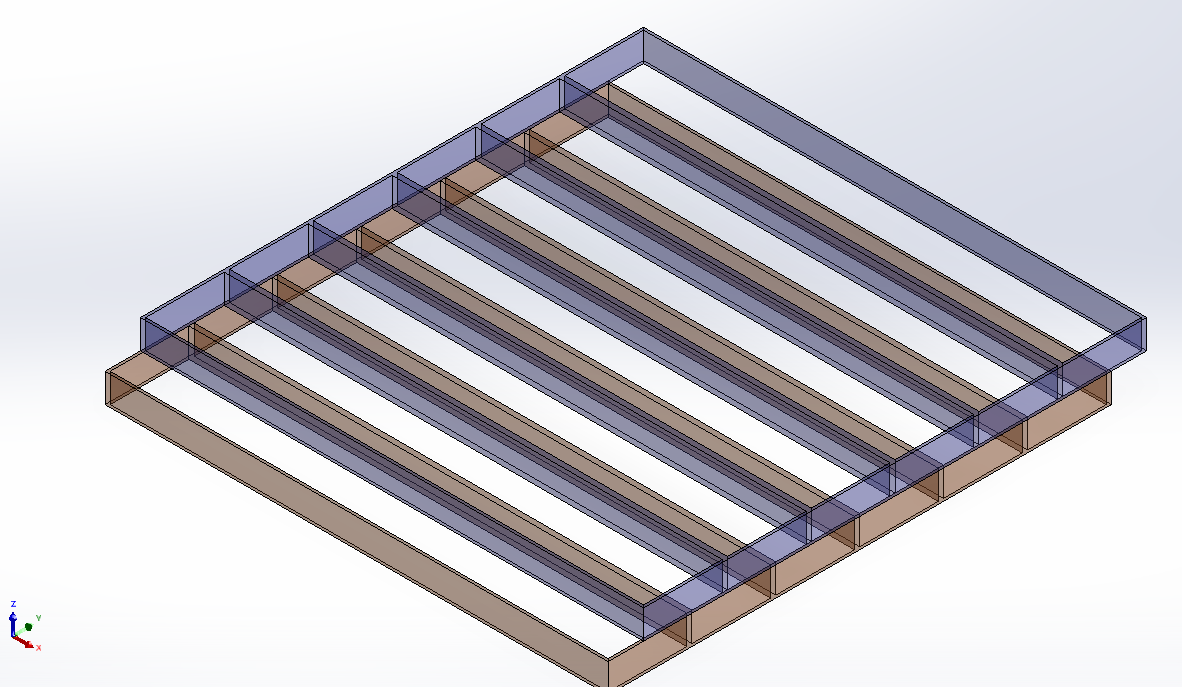
Staggering in X
The x-axis in my drawing happens to be parallel to the line that follows along the full 8’ length of a batt. You could perhaps call this “longitudinal staggering” to make it agnostic to the coordinate frame that I chose in the software.

You can see that most of the paths for air to leak through the thickness still exist. Only the small areas on each end have been closed off. Between each of the 6x rows we have a 1in wide path, the full length. The total leakage here is 576 square inches, or 86.4% of option 1.
Staggering in Y
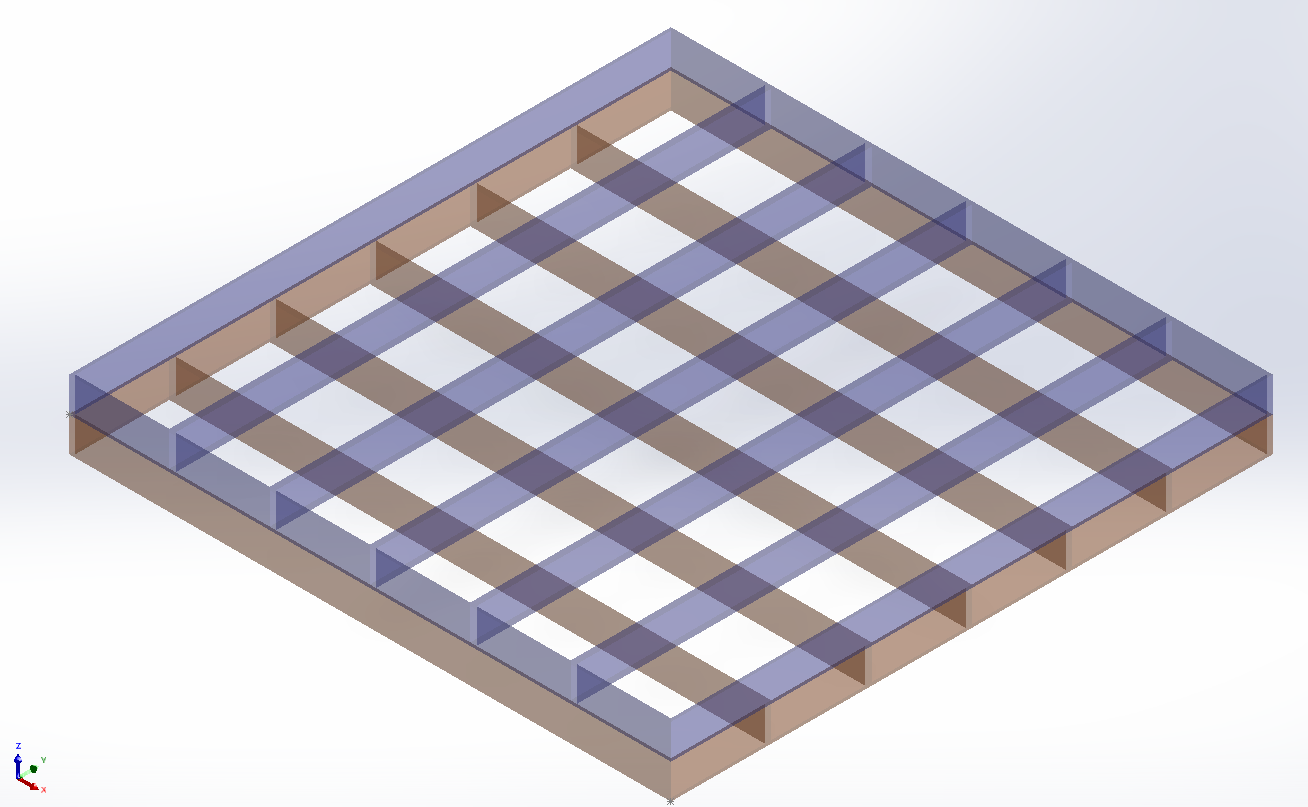
And here’s the other direction. Staggering along the short axis.
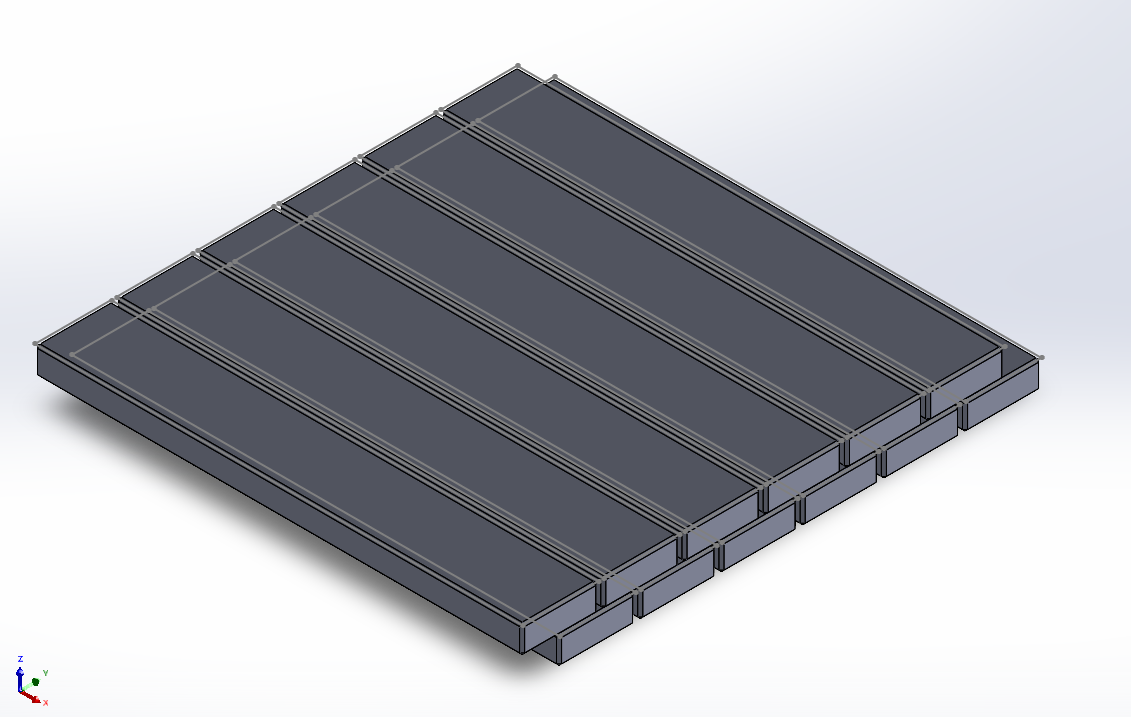

The large paths have all been eliminated. The small ends of each batt are still providing a path all the way from hot to cold, and they line up across all 6x batts side by side. So the total leakage here is 192 square inches, 28.8% of option 1.
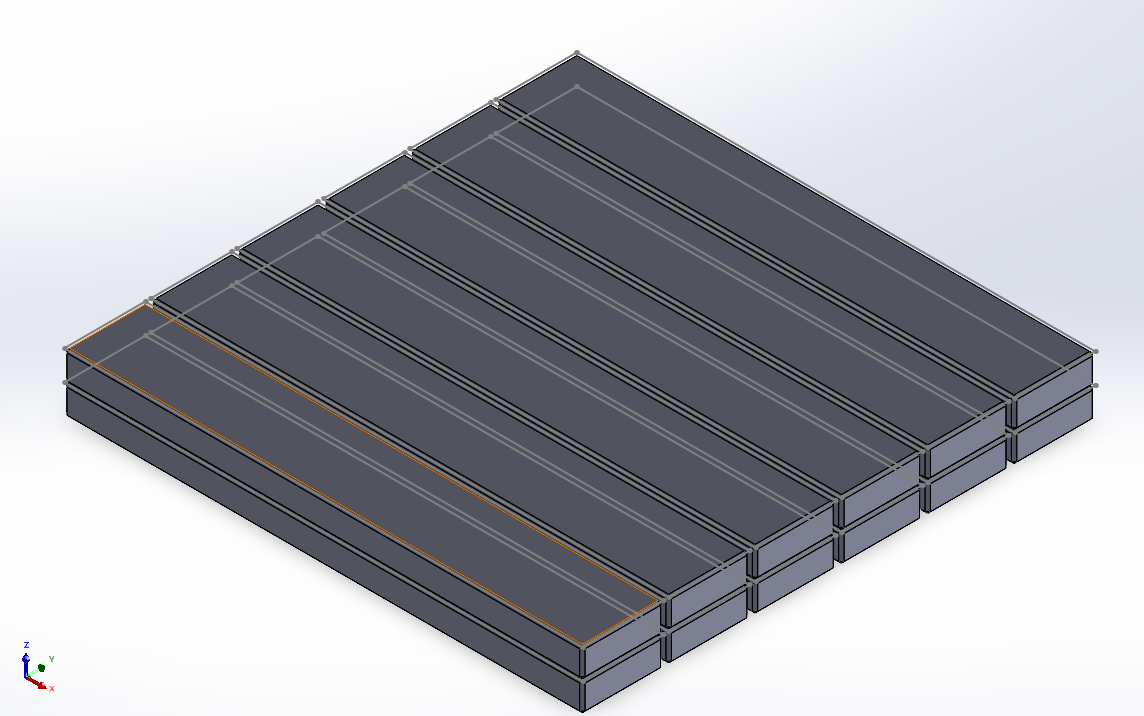
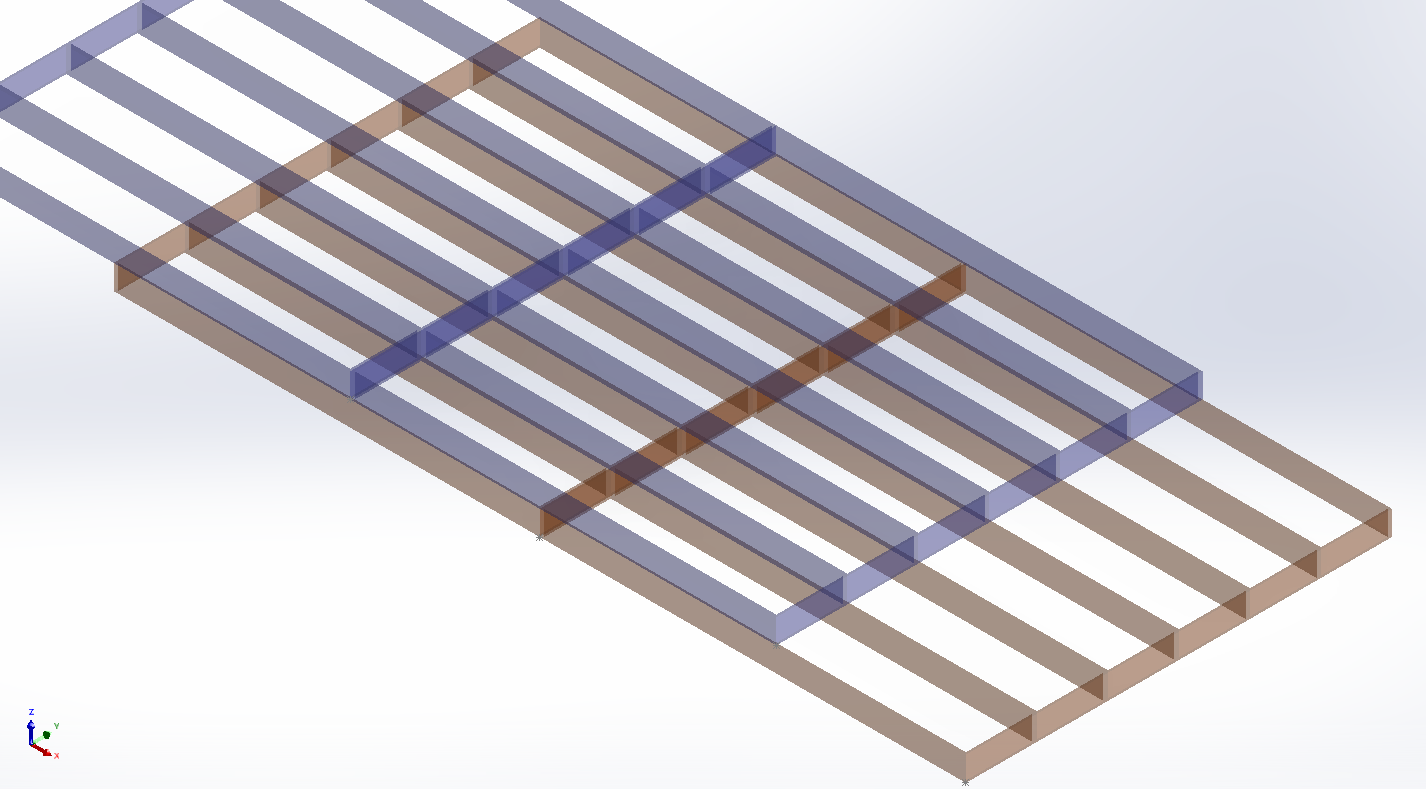
Stagger in both X and Y
The only place left for air to leak is a chimney at each intersection. 1"x1" wide, and 11" tall when two layers thick. There are only 6x of these little chimneys total. So our cross section has gone down to 6 square inches . That’s only 0.9% of option 1, which was the best so far until now.
Practically, staggering in X or Y requires you to fill a half-width with something. So you’ll be cutting a batt the long way or the short way, and cramming it in. This is a pain, don’t ask me how I know. Staggering in both X and Y necessitates you cutting some sort of L-shaped piece out of a full batt, halves elsewhere, etc.
It’s a lot to keep track of. And I personally have a hard time keeping them all straight. I.e. pulling a little tighter on some, a little looser on others, and eventually my lines have shifted to match the layer below. Because I’m a human, and tend to follow existing patterns.
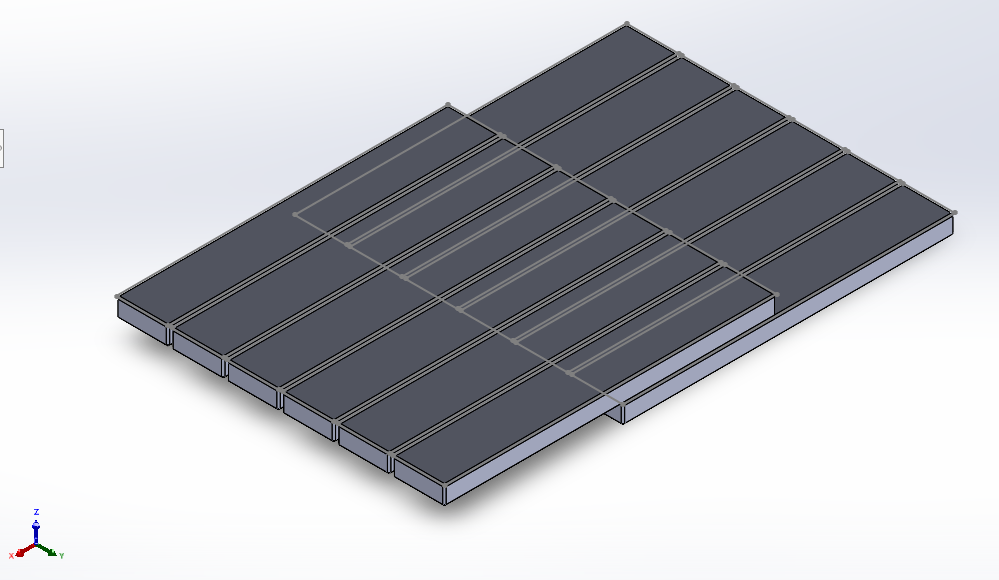
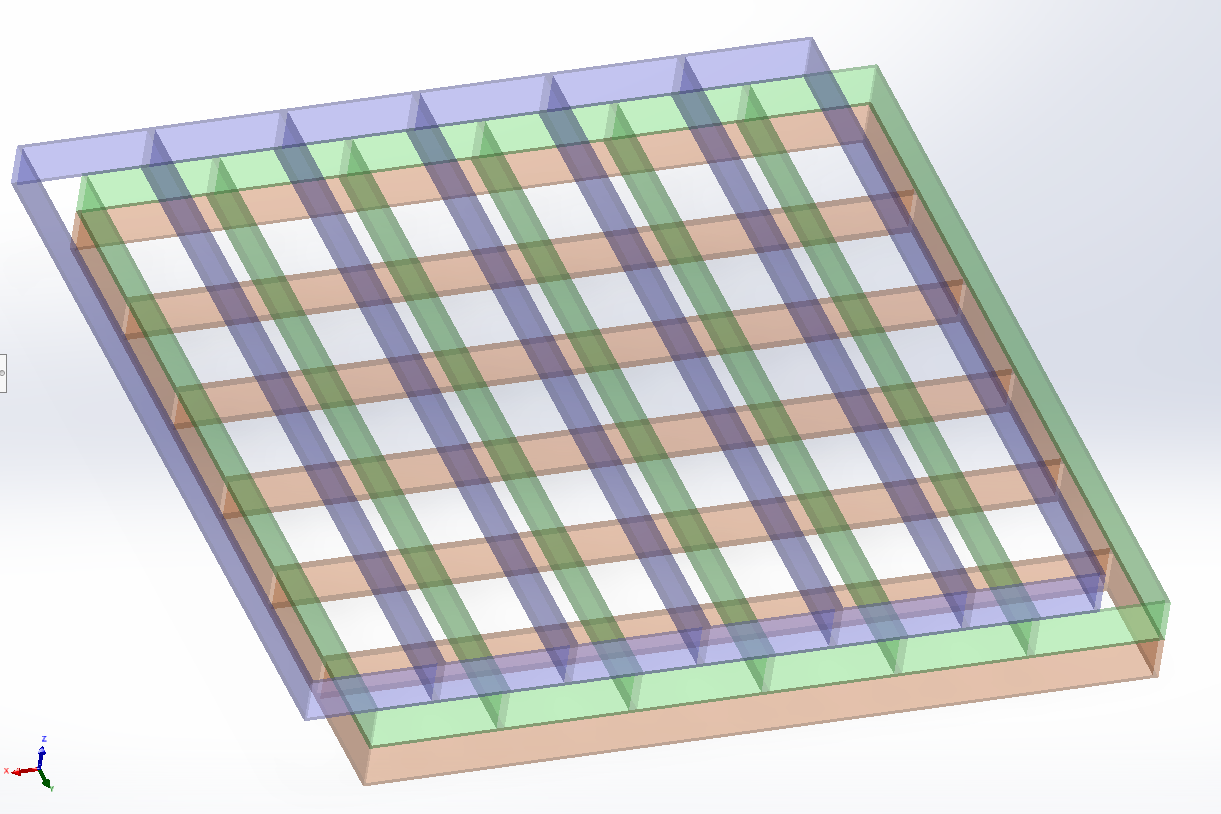
Rotate 90 degrees
What if there a way to keep our leakage small, and simultaneously avoid making lots of cuts? (and breathing in all of the fiberglass dust that generates.)
On paper, there are still gaps along the ends. which makes this about as good as staggering in X. You end up with 96" of leak area around all 4 edges, plus 25x 1"x1" chimneys in the middle. Or, 409 square inches, 61% of option 1.
But in reality, we are stacking up 6x of these side by side, at 15" wide each, that’s 90". Or 6" short of a full 8’ square. So if we’re doing more than 64 square feet of ceiling area (we are, a bedroom legally can’t even be that small in most places), the next square section continues without a leak path because of that 6" offset.
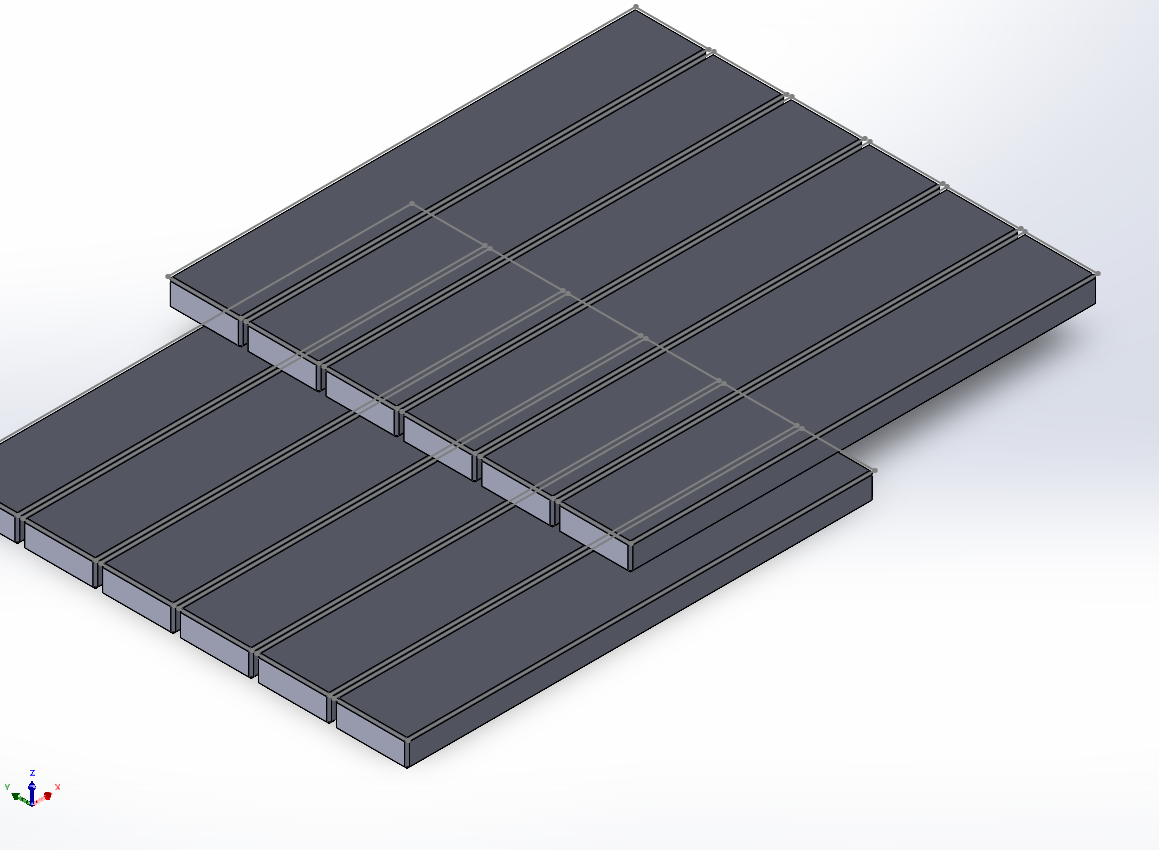
And also in reality, you’re not going to get enough insulation value from 2 layers of fiberglass batts (of “normal” thickness), unless you live in Miami. You’re going for 3x layers or more. And at some point you’re going to hit your roof deck along the edges of the floorplan. So you’re going to start setting back as you build height. Like this.
Which effectively eliminates your gaps entirely. Unless you really suck at installing insulation. Which happens. I used 2 broom handles to install some insulation once in a really shallow area where I was going to spear my head on roofing nails. I’m sure there are some gaps back there at my old house. You do what you can, and let the next guy figure it out…
Final thoughts
Realistically, that’s also true for the other configurations as well. There are no joists to cram it between, so we just stack them up tightly side by side. Most gaps are closed anyways, I just left a little bit of gap here to help visualize the planes that air can flow down without restriction, for those that are visual learners, but can’t visualize something in 3 dimensions in their head.
When the batts are all the same length (usually a hair over 8’ in reality) some options do in fact leave pretty pronounced gaps. Maybe not initially, but after 10 years of settling, it could lead to problems.
The million dollar reddit comment
And “staggering in Z too!” still doesn’t make sense. I have a pattern. In the second layer, I’m moving the entire pattern in X or Y, relative to the one underneath it. I have to have multiple layers for that (in this example, not necessarily something like sheathing on a house). So staggering in Z doesn’t make sense, because by virtue of laying multiple layers of insulation, we’re adding to the thickness in Z. Here’s what that would look like though:
 This is a cross section of the end.
You could cap it off flat by using overall equal thicknesses in each bay I guess. Then alternate them in some other way on your now flat top. But then you’re back at square one, and you may as well just make it easy from the start.
 This shows 3 layers, mostly comprised of 5.5" batts.
But remember that the bottom layer is up against ceiling. So in here you’d have 3.5" faced, 5.5" faced, lots of 5.5" unfaced, and some 3.5" unfaced. That’s 4 different SKUs to go buy. 4 different quantities to estimate and have leftovers for. If your general contractor or sub hasn’t laughed in your face yet, this is how you facilitate that happening.
If you really want no gaps, build a hot roof system that makes your attic conditioned space. Use baffles and spray foam to encapsulate the space. Or just use blown-in insulation. There are no seams with blown in. Let’s not be crazy.