I’ll make a longer post in the future about the state of my homelab. I used to have my original 3u old (2nd gen i3) board running most services, with a few optiplex 7040/7050s running additional services. Minecraft server(s), zoneminder, this website, etc.
Originally everything was Debian on bare metal, running each service containerized with docker. But I started running into port issues, and wanted to split things up into separate IPs, be setup for network segmentation in the future, etc. So I bought a Supermicro X10 micro-ATX board. It came with a Xeon E5 2600 v4 (14 physical cores), 128GB DDR4-2400, and a cooler. A primary concern was zoneminder having heavy r/w activity, ruining a HDD with valuable data on it. So Proxmox allows me to segment my resources better. Zoneminder has access to a 3.5 in old HDD that can be destroyed and replaced, without affecting any of my movies, music, notes and projects from college, the container managing my network, etc.
Proxmox is new to me, so I will try to document some of my struggles along the way in later posts. Long story short I ended up using Ubuntu server 22.04 for a lot of VMs because it was a bit faster to setup than Debian. But Ubuntu likes to manage resources a bit differently than I’m used to in Debian.
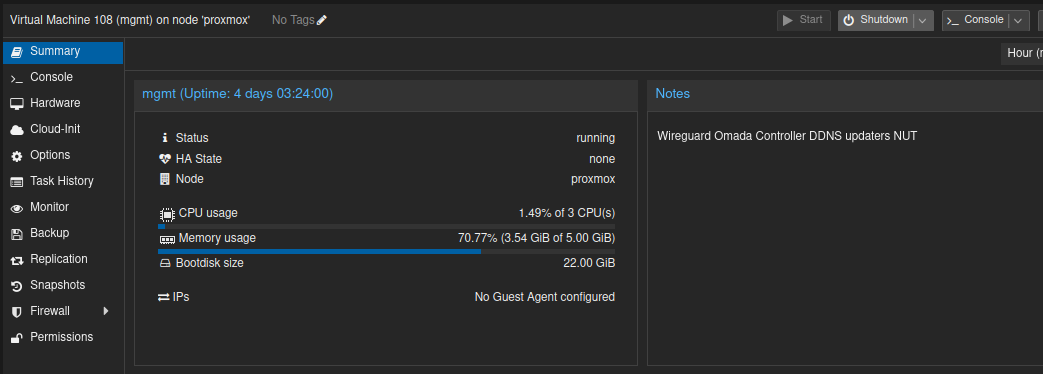
The problem is that the default installation for Ubuntu is to reserve almost half of your HDD space for the /boot directory. So I gave most everything 10GB of my SSD initially. Partition 1 for Grub is 1MB, partition 2 for /boot is 5GB, and my partition 3 for root is only 5GB. I quickly realized I was out of space when I couldn’t log into my Omada Controller webpage. The SQL libraries, docker logs, etc. were filling up my storage space too fast.
So this tutorial was written not because I was bored, but because one of the kids’ devices was booted from the network while they were on vacation, and after a month of being gone they couldn’t use what they wanted to, and I was powerless to unblock them.
Let’s get started. We’ll cover the bare essentials from the bottom of the stack, upwards. Starting with Proxmox allocating some space on a real ZFS disk to your VM.
- Shut down your VM using the GUI.
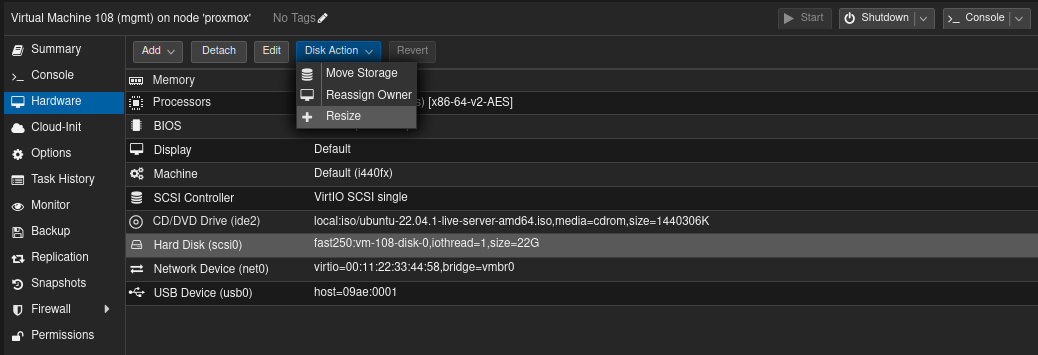
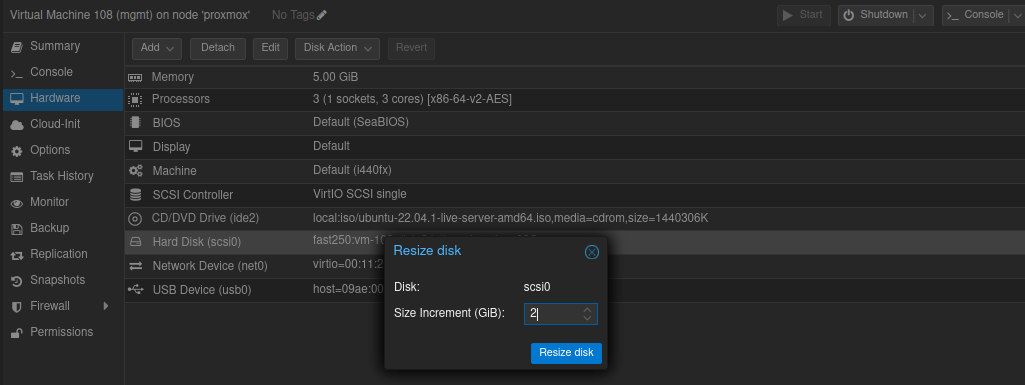
- note: I took screenshots on a different VM that needed some love first, then wrote the rest of the tutorial in a test VM that I created later. Don’t mind the system name and drive size discrepancies.

- Go to the hardware tab on that VM, select your drive, and “Disk Action” “Resize”. By default you will be adding space, so I typed in 2 to add 2GB.


- Boot your VM back up, and get into your console. Either SSH on your local machine, or in the Proxmox web GUI.
- Check your current partitions with “lsblk”. Proxmox should allocate everything as /dev/sda unless you have additional disks, then Ubuntu will use LVM to manage your main partition, 3. You can see that originally I had 10GB (1.8G sda2 + 8.2G sda3), but now it’s showing 12G. *I’m on the test VM now that originated with 10G.
me@test:~$ lsblk
NAME                      MAJ:MIN RM   SIZE RO TYPE MOUNTPOINTS
loop0                       7:0    0  63.4M  1 loop /snap/core20/1950
loop1                       7:1    0  63.4M  1 loop /snap/core20/1974
loop2                       7:2    0 111.9M  1 loop /snap/lxd/24322
loop3                       7:3    0  79.9M  1 loop /snap/lxd/22923
loop4                       7:4    0  53.3M  1 loop /snap/snapd/19457
sda                         8:0    0    12G  0 disk
├─sda1                      8:1    0     1M  0 part
├─sda2                      8:2    0   1.8G  0 part /boot
└─sda3                      8:3    0   8.2G  0 part
  └─ubuntu--vg-ubuntu--lv 253:0    0   8.2G  0 lvm  /
sr0 11:0 1 1.4G 0 rom - Update the partition table to use all of the space. You can use either parted (gparted for a system with GUI) or fdisk. I have had less issues with fdisk.
me@test:~$ sudo fdisk /dev/sda
Welcome to fdisk (util-linux 2.37.2).
Changes will remain in memory only, until you decide to write them.
Be careful before using the write command.
GPT PMBR size mismatch (20971519 != 25165823) will be corrected by write.
The backup GPT table is not on the end of the device. This problem will be corrected by write.
This disk is currently in use - repartitioning is probably a bad idea.
It's recommended to umount all file systems, and swapoff all swap
partitions on this disk.
Command (m for help): m
Help:
  GPT
   M   enter protective/hybrid MBR
  Generic
   d   delete a partition
   F   list free unpartitioned space
   l   list known partition types
   n   add a new partition
   p   print the partition table
   t   change a partition type
   v   verify the partition table
   i   print information about a partition
  Misc
   m   print this menu
   x   extra functionality (experts only)
  Script
   I   load disk layout from sfdisk script file
   O   dump disk layout to sfdisk script file
  Save & Exit
   w   write table to disk and exit
   q   quit without saving changes
  Create a new label
   g   create a new empty GPT partition table
   G   create a new empty SGI (IRIX) partition table
   o   create a new empty DOS partition table
   s   create a new empty Sun partition table
Command (m for help): - We’re going to delete partition 3 entirely. This will just modify the partition table, not delete the data. Then we’ll create a new partition with the same number, 3. We want to use the earliest available block to start, and last available block on the disk as the end point. These are the default selections, so you don’t even need to type your selections in.
Command (m for help): d
Partition number (1-3, default 3): 3
Partition 3 has been deleted.
Command (m for help): n
Partition number (3-128, default 3): 3
First sector (3674112-25165790, default 3674112):
Last sector, +/-sectors or +/-size{K,M,G,T,P} (3674112-25165790, default 25165790):
Created a new partition 3 of type 'Linux filesystem' and of size 10.2 GiB.
Partition #3 contains a LVM2_member signature.
Do you want to remove the signature? [Y]es/[N]o: n
Command (m for help): w
The partition table has been altered.
Syncing disks.- Resize your physical volume using physical volume scan (pvscan) and physical volume resize (pvresize) utilities. *This step may not be entirely necessary. I think if the pv is left alone, the next utility will sort it out automatically, but I’m unsure if that’s true.
me@test:~$ sudo pvscan
  PV /dev/sda3   VG ubuntu-vg       lvm2 [<8.25 GiB / 0    free]
  Total: 1 [<8.25 GiB] / in use: 1 [<8.25 GiB] / in no VG: 0 [0   ]
ben@jf-smb:~$ sudo pvresize /dev/sda3
  Physical volume "/dev/sda3" changed
  1 physical volume(s) resized or updated / 0 physical volume(s) not resized
ben@jf-smb:~$ sudo pvscan
  PV /dev/sda3   VG ubuntu-vg       lvm2 [<10.25 GiB / 2.00 GiB free]
  Total: 1 [<10.25 GiB] / in use: 1 [<10.25 GiB] / in no VG: 0 [0   ]
- Resize your logical volume for LVM using the logical volume display (lvdisplay) and logical volume resize (lvresize) utilities. You can use –extents flag on lvresize, or -l shorthand.
me@test:~$ sudo lvdisplay
  --- Logical volume ---
  LV Path                /dev/ubuntu-vg/ubuntu-lv
  LV Name                ubuntu-lv
  VG Name                ubuntu-vg
  LV UUID                HbcxIy-OoWk-r2fM-04ti-oway-3iTp-ott1vi
  LV Write Access        read/write
  LV Creation host, time ubuntu-server, 2023-07-01 16:40:14 +0000
  LV Status              available
  # open                 1
  LV Size                <8.25 GiB
  Current LE             2111
  Segments               1
  Allocation             inherit
  Read ahead sectors     auto
  - currently set to     256
  Block device           253:0

me@test:~$ sudo lvresize -l +100%FREE /dev/ubuntu-vg/ubuntu-lv
  Size of logical volume ubuntu-vg/ubuntu-lv changed from <8.25 GiB (2111 extents) to <10.25 GiB (2623 extents).
Logical volume ubuntu-vg/ubuntu-lv successfully resized.- Resize the EXT4 filesystem that sits inside that LV. This is the final step, this is exciting isn’t it? We’ll use the resize2fs utility to achieve this. If you have something other than ext2, ext3, or ext4 this utility will not work for you.
me@test:~$ sudo resize2fs /dev/ubuntu-vg/ubuntu-lv
resize2fs 1.46.5 (30-Dec-2021)
Filesystem at /dev/ubuntu-vg/ubuntu-lv is mounted on /; on-line resizing required
old_desc_blocks = 2, new_desc_blocks = 2
The filesystem on /dev/ubuntu-vg/ubuntu-lv is now 2685952 (4k) blocks long.
- That’s it. Everything should resize on the fly. No need to reboot. Although I usually do for good measure. And my services were broken before this, so it’s good to see if everything starts again as it should on boot instead of going into “sudo service –status-all” or trying to restart individual services one at a time.
- Before you forget, now is a great time to make a backup of your VM. Because we will undoubtedly make another stupid mistake in the future and break everything again!