Streamlining Hugo
hugoproxmoxtruenasnfs sharebash script
1272 words. Read time: 5 Minutes, 46 Seconds
2025-07-12 19:28 +0000
I recently switched from WordPress to Hugo. But I haven’t been posting a lot, even though I have been learning a fair amount of things that are worthy of posting. The way that I’m doing this is less than ideal, and has been a hindrance to me. So if it’s not easy to do, I’m not going to take the time to do it. Here’s what I had going on.
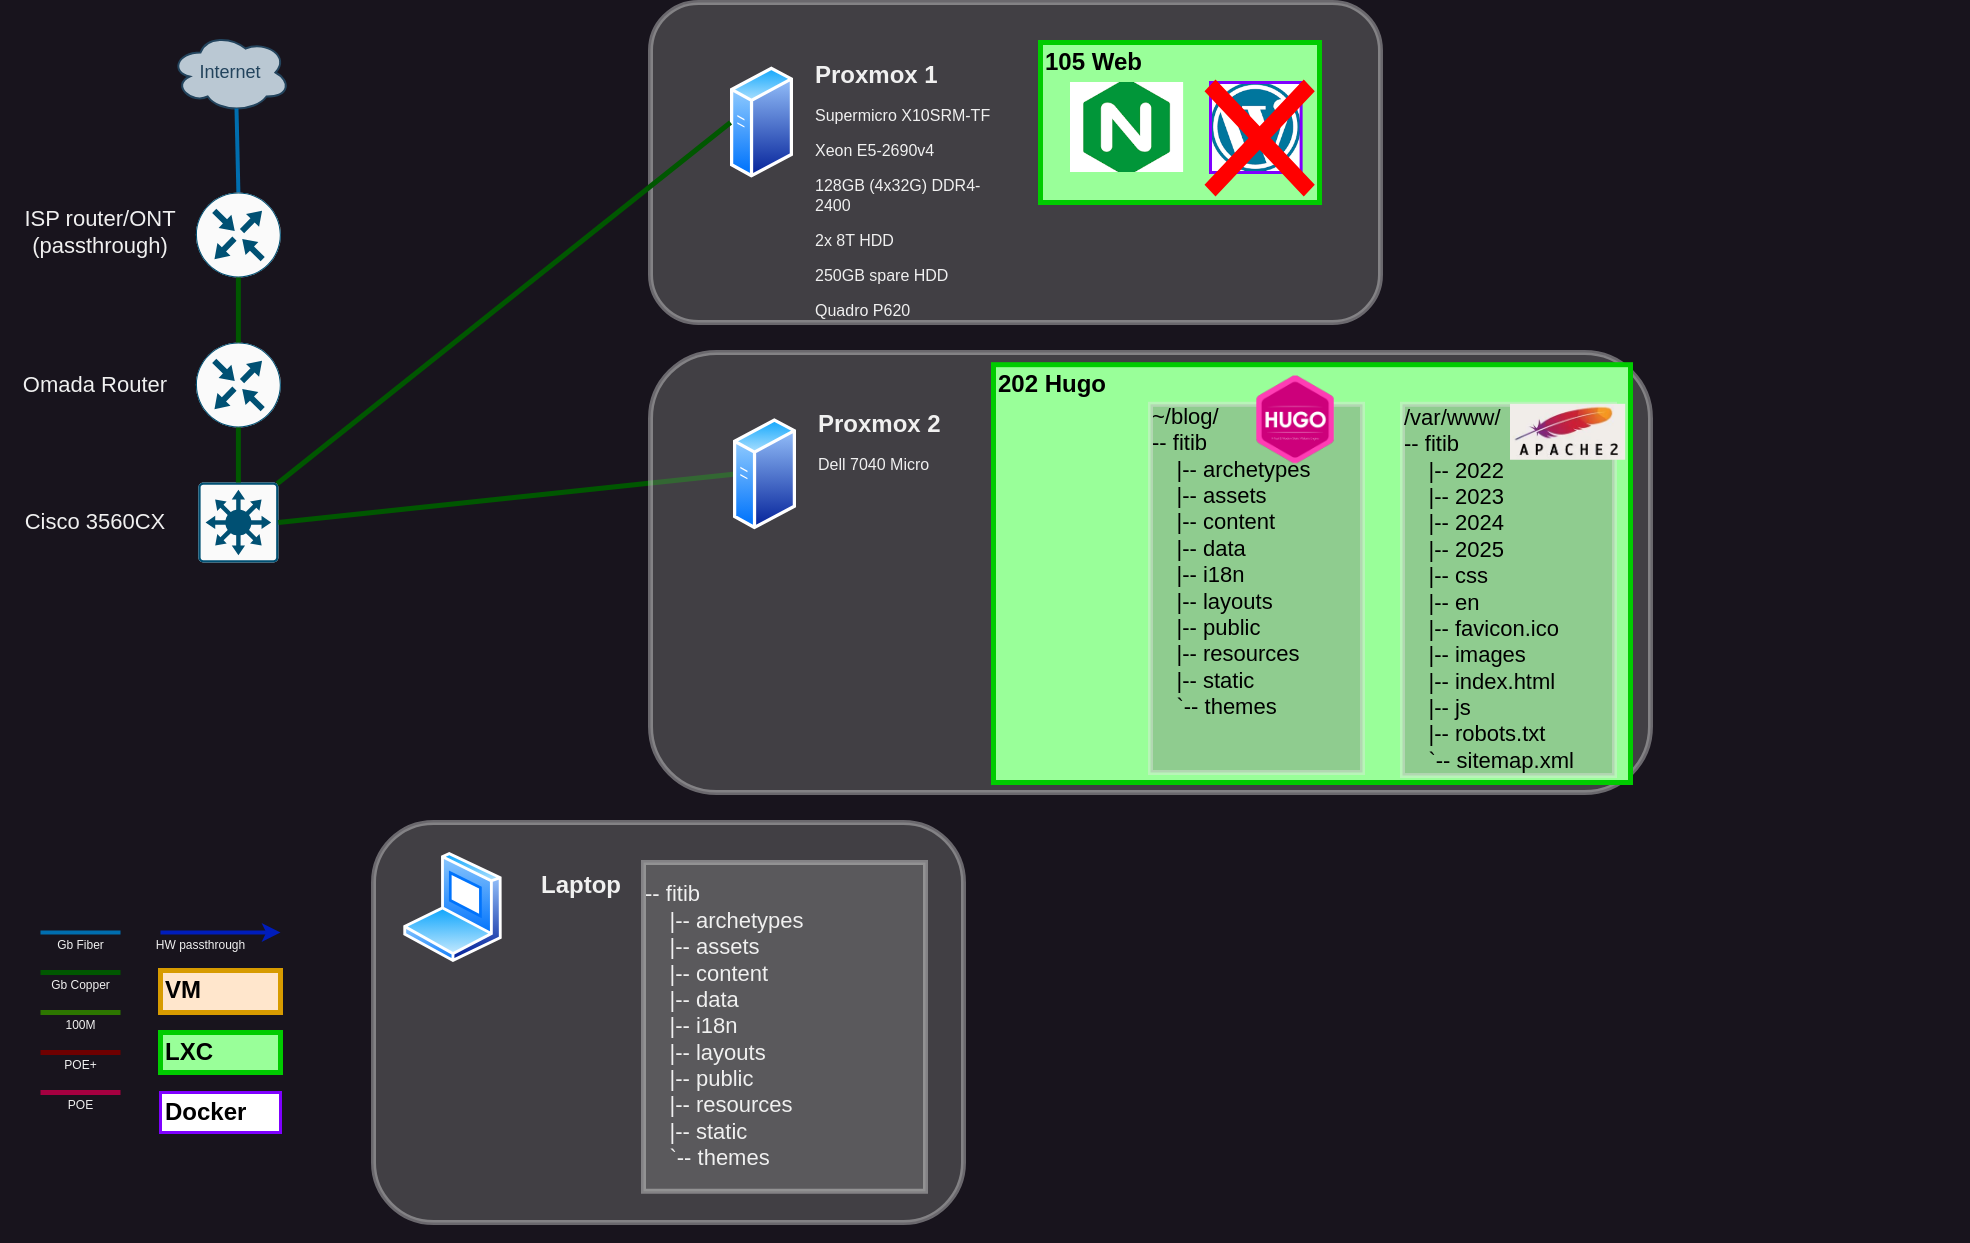
- Export WordPress site and move/unzip on my laptop.
- Create markdown file in ./content/posts and put images in /static/images/yyyymmdd/ on laptop.
- SSH the new .md file and image folder onto hugo-machine:/home/blog/fitib.
- SSH into the Hugo machine and rebuild my site with hugo cli.
- Move the ./public/ directory only into /var/www/ for Apache2 to serve the static files.
- Check post in browser. Look for missing images, bad formatting, etc.
- (optional) Repeat steps 1-5 until it works as expected.
This is not that many steps. They’re just tedious, mostly. I’m too lazy (so far) to create certs for all of my devices and setup password-less SSH amongst my network. And I find catharsis in having a moderate level of security. So to SSH files across systems, I’m opening my browser and doing that through the Proxmox console. Trying to remember the paths, etc. It takes a while. If I forget a single image file, it’s a bit of a bear to go re-run all of those commands again after I’ve mentally moved on.
So let’s fix this process
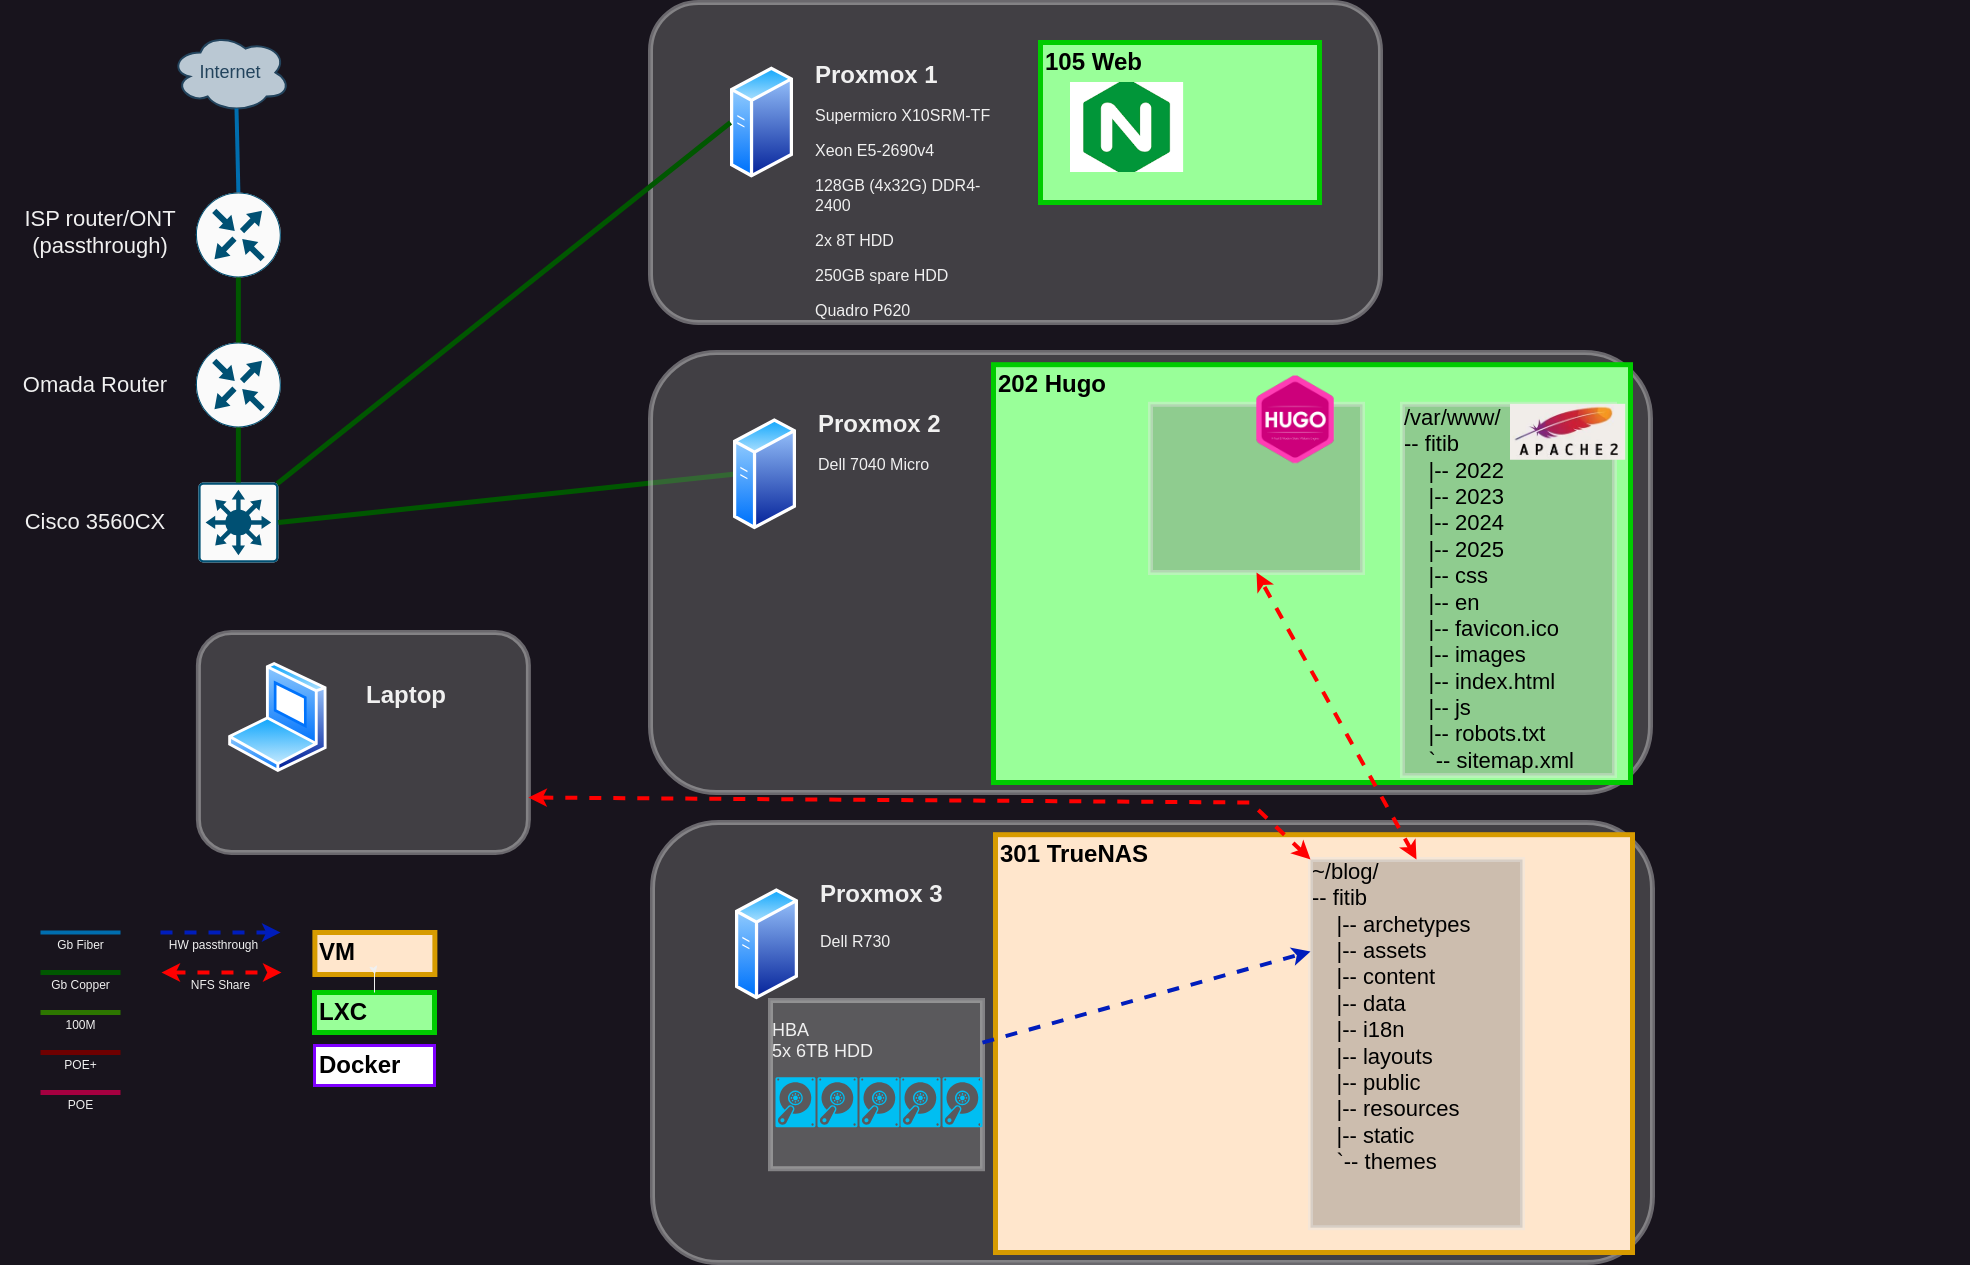
In general, I just want to have shared storage between my laptop and Hugo LXC container. Then I can get into the blog directory easily as a mounted NFS share. When I create the markdown file and images, they’re already accessible on the Hugo machine with no extra work.
Then I’m being smart with my site config.toml file to create the public folder in the /var/www directory so I don’t have to manually move it. Finally, I’m creating a bash script to run around midnight each night and re-build the site automatically. I generally write and post at night anyways, so they will automatically pop up in the morning.
I’m a visual learner, so here’s what that new process looks like.
- Create markdown file on laptop. Paste images into correct folder.
- (optional) Run hugo cli command to create site early and proofread/edit as needed.
- ???
- Profit!
Get NFS Share on Laptop
On the side, I bought a Dell R730 and 5x 6TB SAS drives. Then I installed TrueNAS Scale as a virtual machine, made sure the host bus adapter (HBA) was in “IT Mode”, and passed through the entire HBA to the VM. Now TrueNAS has block-level access to the drives, like it wants. You don’t need to do this, you could pass through each HDD separately, but it’s know in the community to create problems periodically. Best practice is to pass through the HBA entirely. But I digress…
This is not a TrueNAS tutorial. So let’s skip some steps, and go straight to the part where I have a /blog/ share created, and available to my local network as a NFS share. Way to go, team! We did it.
Now I need to get it onto my laptop. I tested the share first to make sure it worked.
$ sudo mount -t nfs [IP of TrueNAS server]:/mnt/slow18t/blog ~/mounts/blog
Once it works, unmount it, then edit your /etc/fstab file to include this line
[IP of TrueNAS server]:/mnt/slow18t/blog /home/ben/mounts/blog nfs defaults,_netdev,soft,timeo=300 0 0
Get Same NFS Share on Hugo Machine
I am running LXC containers for most things, and they’re a little funky how they work (even privileged LXCs, apparently, but I’m not sure of the peculiarities yet).
The root user would normally be UUID 0. But the developers don’t want root@your-lxc-container being able to run commands as root@proxmox-host. So the way I understand it, new users are created, and offset by some number. So a root user for my LXC is actually 100000. If I created UUID 120 inside the LXC, it would show up as 100120 on the host.
But NFS shares work in this way only because the user/group (UUID/GUID) are setup correctly across systems. It’s not like a SMB/CIFS share, which can be a little easier to configure. Long story short, NFS is impossible to get to work for a LXC. So there’s a workaround.
Note: I am using the options in Truenas “Mapall User” and “Mapall Group” because of the user/group unique ID weirdness with proxmox LXCs being so hard to navigate (and to even wrap your head around sometimes). I created a user and group blog:blog when I made the share. So with these options turned on, any machine that connects will write a file, and when it actually gets onto the TrueNAS filesystem, it will be owned by blog:blog. This can create some security issues. So I’m making sure that the share is only available to three users; the Hugo machine, and my laptop (separate static IP for wifi and wired both included).
We are going to mount the NFS share to the Proxmox host, then pass that directory through into the LXC’s local filesystem.
Mounting the NFS share is exactly the same as what I did on my laptop. Just make sure you’re in the Proxmox host shell when you do that.
You can’t use the Proxmox GUI to pass through an individual folder. At least not easily that I"m aware of. So we are going to use the pct command to do it manually instead.
pct set 202 -mp1 /mnt/pve/blog,mp=/mnt/blog
202 is the container ID for the device I’m targeting. You can change the mount point to 2, 3, 4 whatever if you already have something else mounted. The string before the comma is where the NFS share is located on the host. The point behind the comma is where you want it inside the LXC filesystem.
Side Quest: Clean up my previous sins
I’m just moving the hugo directory from where I originally had it into the new directory, then checking I can see everything from my laptop. Just a mv ./old_directory /mnt/blog/fitib
If you’re smart and setting up Hugo for the first time, you’ll just do it right from the very beginning. If you’re me, you get to do extra work.
Automate Hugo Site Generation
Firstly, I need to be smart about generating the site. We can do this two ways.
- Run the hugo command with -d flag and the location of my final directory, /var/www/
hugo build -d /var/www/fitib
- Put that directory into your hugo.toml configuration file. This line is up in the very first block of options, and easy to find.
publishDir = "/var/www/fitib/"
So if it wasn’t apparent, if we do option 2, we can just run hugo build now without the -d flag
Finally, we’re going to make the simplest bash script that has ever been made, make it executable, and make a cron job for it at 2am every single day.
nano ./hugo_build.sh
#!/bin/bash

hugo build --source /mnt/blog/fitib
This script is in a different directory than the root directory of the Hugo project. So we need to specify the project directory.
chmod +x ./hugo_build.sh

crontab -e
0 2 * * * /some_directory/hugo_build.sh
That’s it! I should have some feedback of some sort. But I write like one article every few weeks, to be generous. So if it fails one day, I’ll make it better. If it just keeps working, it will stay how it is until the cockroaches take over the earth.
I’ll add more to the script later, to consolidate the entire build process. But we’ll get into that more later.